Load Testing WebSocket Applications
Remember the days when chatting on platforms like AIM Messenger felt like a revolutionary way to connect with friends? Real-time messaging was groundbreaking back then. Fast forward to today, and we effortlessly use apps like Gmail, Slack, WhatsApp, and Instagram without a second thought. This seamless real-time communication owes much of its evolution to the WebSocket protocol. In this article, we’ll dive into the basics of WebSockets, explore their features and benefits, and examine how stress testing WebSocket-dependent applications and websites can reveal their performance under pressure to ensure an optimal user experience.
What are WebSockets
A WebSocket is a two-way (bidirectional) computer communication protocol over a single TCP connection. It enables interactive applications by establishing a persistent connection between the client (typically a web browser) and the server. While this connection remains open, it allows both parties to initiate data transmission at any given time without the overhead of multiple HTTP requests. To explain it further, unlike traditional HTTP, where a client initiates requests, Websockets allow the servers to push information to the clients spontaneously. The client can still make regular HTTP requests alongside the WebSocket connections. There are major web servers such as Nginx, Apache, and Windows Server that support WebSockets. Other browsers also support WebSockets such as Chrome, Microsoft Edge, Internet Explorer, Firefox, and Safari.
Where are WebSockets Used?
WebSockets are fairly common in today’s digital landscape, and you can find them in various scenarios where there is a demand for real-time data and instant updates. Some examples of where you can typically find WebSockets used are:
- Chat Applications: Used to facilitate instant messaging and group chat functionalities.
- Live Feeds: May be used for broadcasting live data such as financial market updates or information on your latest sports game/score.
- Collaborative Editing: WebSockets in this scenario would allow multiple users to edit documents simultaneously.
- Online Gaming: Helps to support real-time multiplayer gaming and interactions.
- Internet of Things: Helps to facilitate any real-time monitoring and control of devices.
Advantages and Benefits of WebSockets
WebSocket technology offers several advantages over traditional HTTP-based communication:
- Low Latency: This enables real-time data exchange with minimal delay and minimal overhead such as HTTP headers and cookies ensure a fast and seamless data transfer.
- Continuous Connection: With a bi-directional connection, it allows both the clients and server to send data asynchronously. You can send information to the client at any time, even without client requests.
- Efficiency: Eliminates the need for repeated HTTP connections which reduces overhead.
- HTTP Polling: Clients can continuously query the server for the latest information, which is common in many applications and is often for RESTful practices.
- Scalability: WebSockets support thousands of simultaneous connections on a single server.
Disadvantages of WebSockets
Despite its advantages, WebSocket technology presents certain challenges:
- Complexity: Implementing and maintaining WebSocket connections requires careful handling of state and error conditions. WebSockets are more intricate to implement than HTTP. While an HTTP connection can be established using Telnet, this isn’t possible with WebSockets.
- Proxy and Firewall Issues: Some network configurations may block WebSocket connections, requiring additional configuration or fallback mechanisms. This leads to load balancing and configuring proxies for WebSockets being problematic.
- Resource Consumption: Keeping connections open can consume server resources, necessitating efficient resource management strategies.
- Lack of Built-in Reconnection Handling: WebSockets do not inherently support automatic reconnection handling if the connection drops unexpectedly.
Performance Testing for Applications Using WebSockets
WebSockets are commonly used for real-time applications like chat systems or live content feeds on websites. However, improper implementation can lead to performance issues that impact user experience. To mitigate these risks, conducting thorough load and stress tests on our applications or websites is crucial. These tests help identify performance issues, bottlenecks, or degradation under high loads of concurrent users which helps to provide insights into the user experience. Here’s how performance testing applies to WebSocket applications:
- Simulating Concurrent Users: Testing tools like LoadView can simulate thousands of WebSocket connections to assess how the application handles concurrent users.
- Stress Testing: Identifying the maximum load capacity of WebSocket servers and ensuring they perform reliably under peak loads.
- Real-time Metrics: Monitoring and analyzing metrics such as latency, throughput, and error rates to identify bottlenecks and optimize performance.
Why Load Testing Web Sockets is Important
Load testing WebSockets is crucial for ensuring the reliability, scalability, and performance of real-time applications like live chat, online gaming, financial platforms, and IoT devices. Unlike traditional HTTP, WebSockets maintain persistent, bidirectional connections which makes them capable of handling high volumes of concurrent users. However, this also introduces challenges such as increased risk of latency, bottlenecks in server and network infrastructure, and vulnerability to issues like denial-of-service (DoS) attacks under heavy traffic. Load testing helps uncover these limitations, identify performance bottlenecks, and ensure systems maintain low latency and responsiveness even during peak usage. Additionally, it enables businesses to plan for scalability, optimize resource allocation, and enhance security, all while delivering a seamless user experience. Without rigorous load testing, WebSocket applications risk degraded performance, user dissatisfaction, and unnecessary operational costs.
Performance Testing with LoadView Using the EveryStep Web Recorder
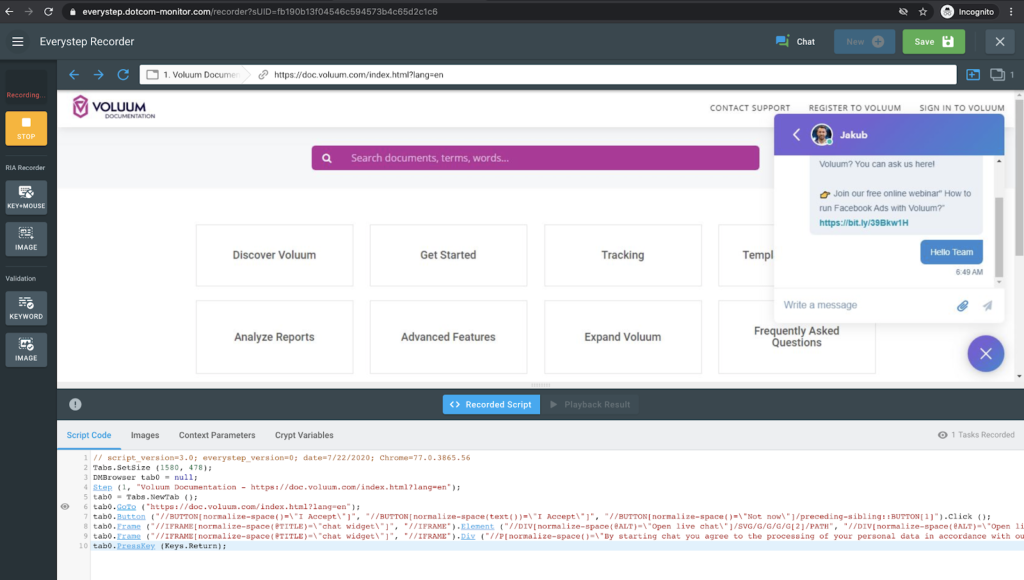
The EveryStep Web Recorder includes a screen recording feature that captures client-side interactions during browsing, enabling simulations of interactions with websites and applications. It supports over 40 desktop and mobile browsers, as well as frameworks and technologies used in dynamic web applications such as HTML5, Java, Ruby, React, Vue, Angular, and Knockout, among others. If it can render in a browser, EveryStep Web Recorder can create a script for it. Users can record each step of a web transaction by navigating through the application, then replay these scripts in real browsers. These scripts can be further tested under various workloads to assess performance.
Here are the steps involved in recording scripts with EveryStep Web Recorder and conducting a load test using LoadView:
1. Navigate to the LoadView testing homepage, where various load test options are available.
2. Choose the Web Application option to begin recording the user journey, tailored to our specific use case.
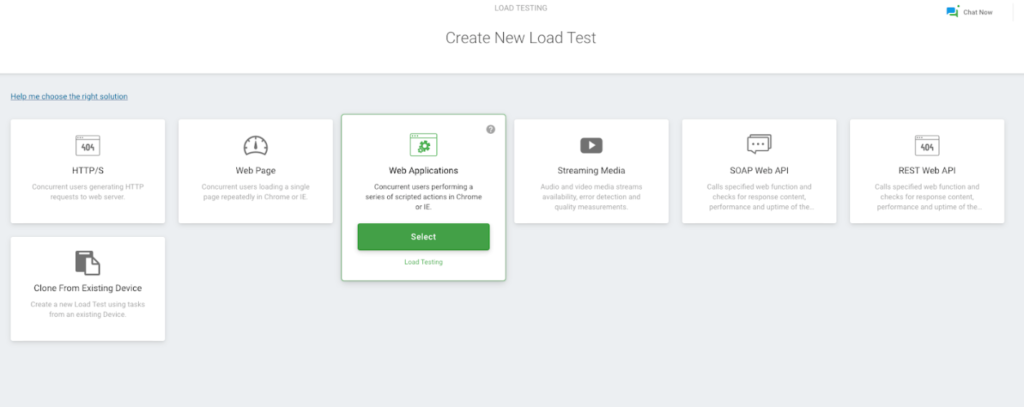
3. Select the “Record New Script” option. Enter the website URL, browser type, and user device type for the application you want to load test. After entering the details, click the “Record Now” button to start recording your test case.
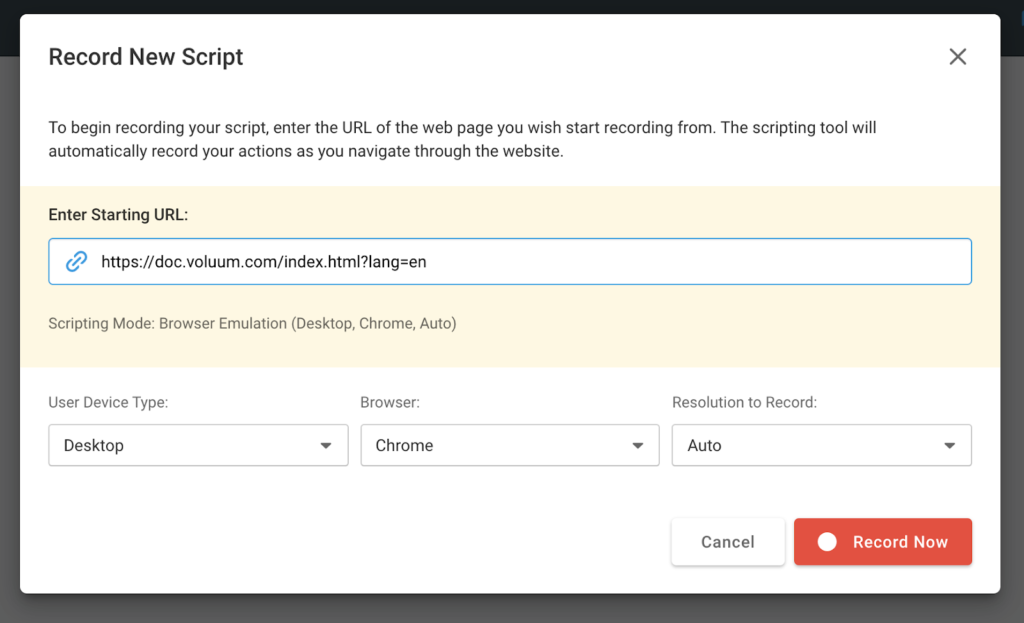
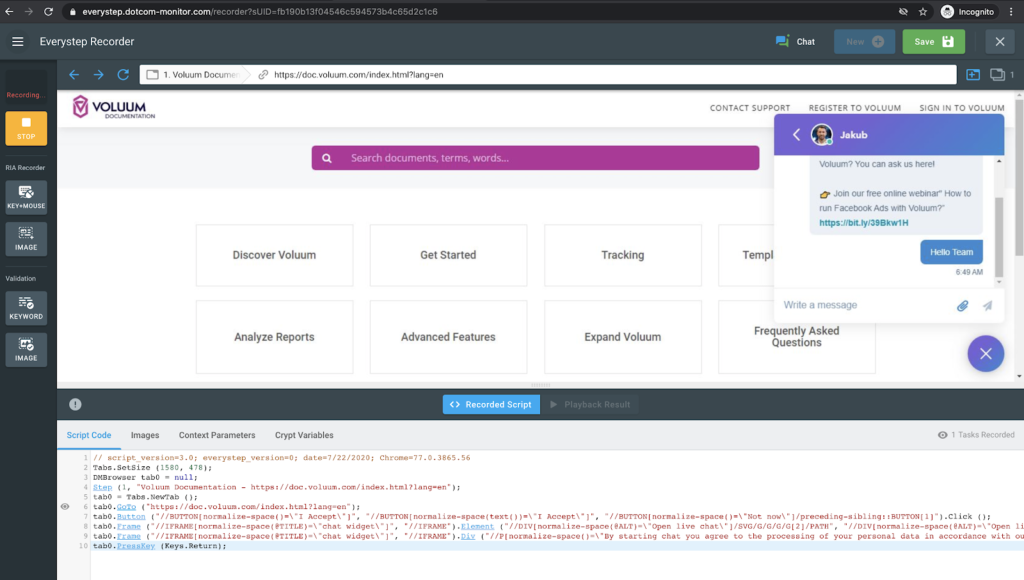
4. Clicking the “Record Now” button allows you to interact with the website under test and record the steps you want to simulate. Once the user flow is completed, you can stop the recording.
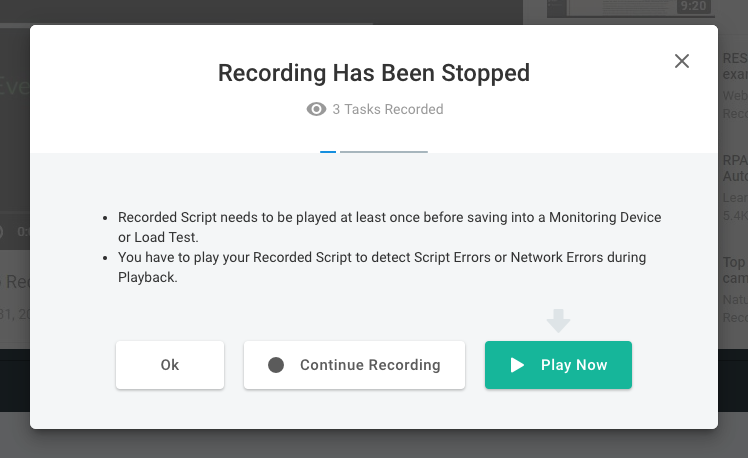
5. After successfully recording our script, we can review our test scenario by selecting the “Play Now” button. Alternatively, we can proceed to testing by clicking the “Continue” button.
6. Clicking “Continue” redirects us to the Create Test window with the simulated actions script ready. Here, we can name our test and then click the “Create Device” button to proceed.
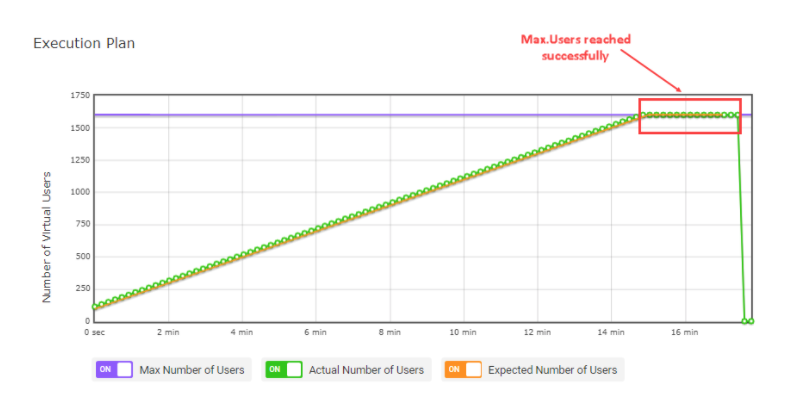
7. After successfully creating a device, you will be taken to the Test Scenario screen. Here, you can set the load curve type, which varies based on the goals of your load test. The image below illustrates the different load test curves available in LoadView for developers and performance testers.
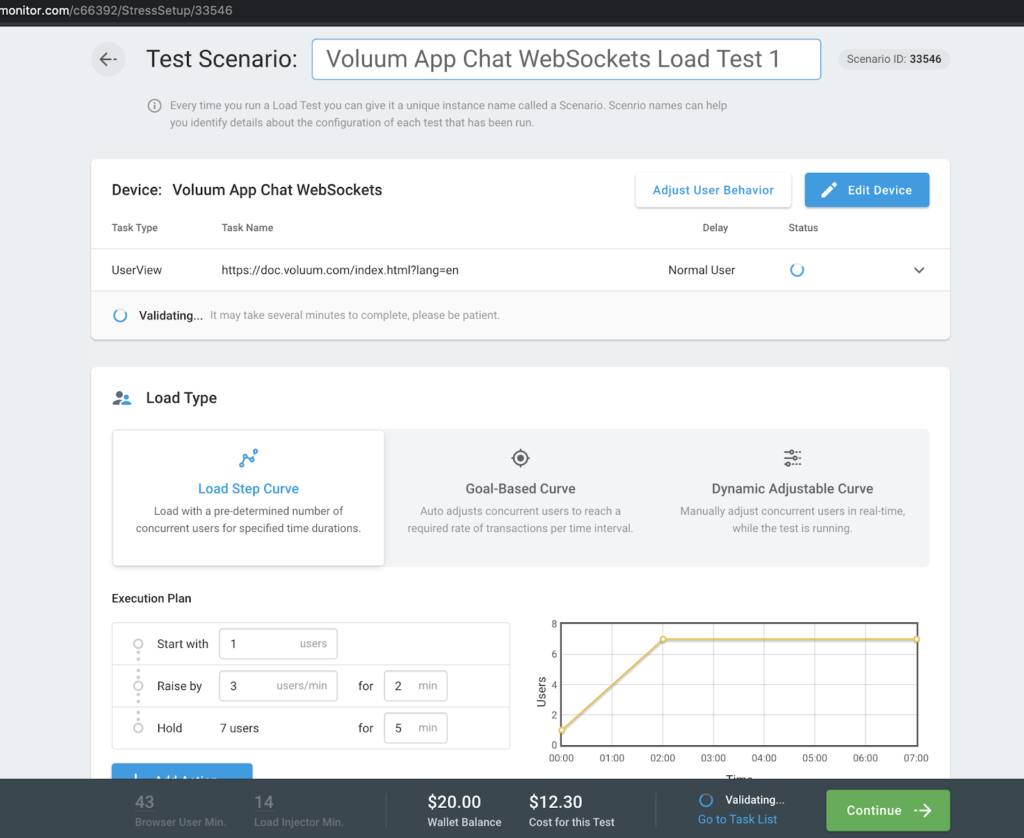
8. After selecting the load curve, you can set the number of concurrent users and the test duration to begin the test execution. Additionally, you can choose from over 40 geo-locations to run the tests, ensuring performance measurement from locations where your users are based.
Once the test is complete, you can view the results and associated metrics. An example of this is shown in the images below.
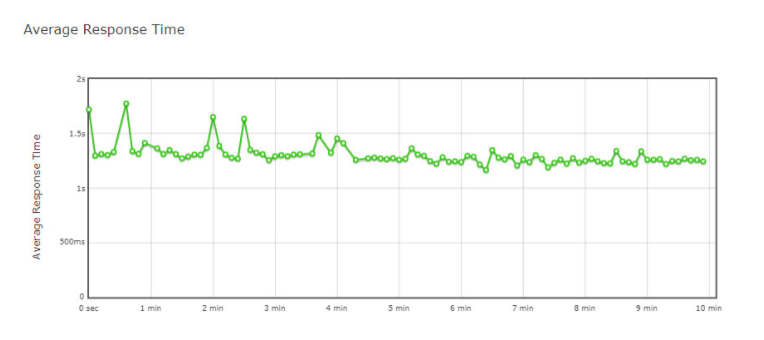
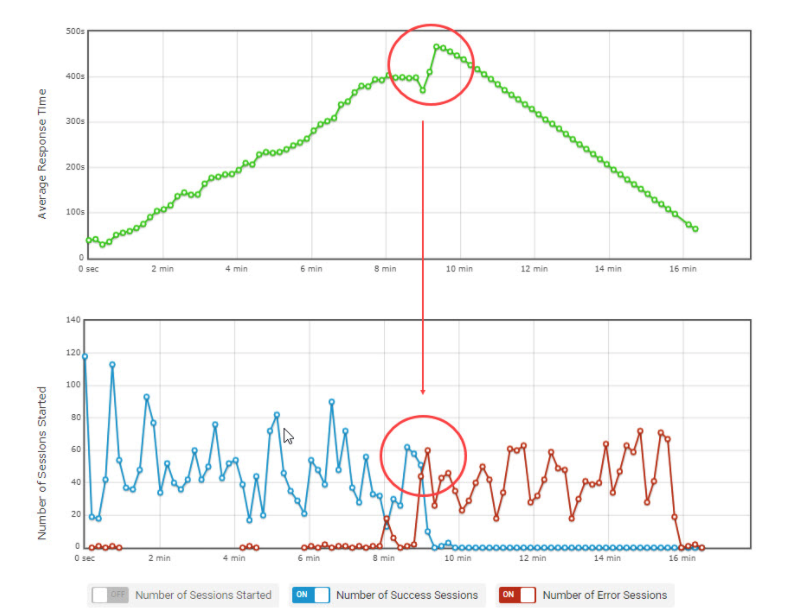
Parallel Average number of users with Average Response time graph.
Summary: Load Testing WebSocket-Based Applications
In conclusion, WebSocket technology revolutionizes real-time communication in web applications, offering unparalleled efficiency and interactivity. However, its implementation brings unique challenges that require careful consideration, especially in terms of performance and scalability. Load testing plays a crucial role in ensuring WebSocket applications meet performance expectations under various loads and conditions which ultimately enhances user experience and application reliability. We provided a step-by-step guide on testing a WebSocket-based application using LoadView and the EveryStep Web Recorder, which can help identify major problems inherent in WebSocket architecture.
Try the EveryStep Web Recorder now to see how easy it is to start scripting complex user scenarios. Sign up for the LoadView free trial to run load tests for your WebSocket-based applications. Alternatively, you can schedule a one-on-one demo with one of our performance engineers!
- What are WebSockets
- Where are WebSockets Used?
- Advantages and Benefits of WebSockets
- Disadvantages of WebSockets
- Performance Testing for Applications Using WebSockets
- Why Load Testing Web Sockets is Important
- Performance Testing with LoadView Using the EveryStep Web Recorder
- Summary: Load Testing WebSocket-Based Applications
Next Level
Experience unparalleled features with limitless scalability. No credit card, no contract.