Guide to Conducting Load Tests with LoadView
Ensuring your application can handle high and heavy traffic is crucial in today’s digital landscape. Load testing is a vital component of performance testing that evaluates how an application performs under a specified load. LoadView is a cloud-based load testing tool that provides a comprehensive solution for simulating real-world traffic conditions. This guide will walk you through conducting load tests using LoadView, from setup to analysis. It will help ensure that you know how to optimize your applications for peak performance.
Defining Load Testing
Load testing is a type of performance testing that assesses how well a system, software application, or website can handle a specified load. The load can refer to the number of concurrent users, transactions, or the amount of data being processed. The primary goal is to identify performance bottlenecks and determine if the application can perform well under expected and unexpected load conditions.
How is Load Testing Important
- Identify Performance Bottlenecks: Load testing helps in identifying slow performance areas which enables your developers to optimize code and improve efficiency.
- Ensure Scalability: It ensures that your applications can scale to handle increased traffic without degrading performance.
- Improve User Experience: By ensuring that your applications perform well under load, you enhance the user experience which leads to higher user satisfaction and retention.
- Prevent Downtime: Load testing helps in identifying the breaking point of an application. This ultimately prevents potential downtime during peak usage.
Introduction to LoadView
LoadView is a powerful cloud-based load testing tool that enables you to test the performance of your websites, web applications, and APIs. Unlike other tools that use headless browsers, LoadView employs real browsers which provide more accurate and realistic testing results.
Key Features of LoadView
- Real Browser Testing: LoadView uses real browsers to generate load ensuring accurate simulation of user behavior.
- Cloud-Based: Being cloud-based means you can scale your tests without worrying about owning and managing your own infrastructure.
- Comprehensive Reporting: LoadView provides detailed reports and insights to help you pinpoint performance bottlenecks. Through comprehensive reports, you can easily navigate and see what your issues are quickly.
- Global Reach: Simulate traffic from multiple locations worldwide to understand your website or application’s global performance.
- Easy Setup: User-friendly interface and easy-to-follow setup processes. You can start load testing minutes after signing up.
Getting Started Load Testing with LoadView
To begin using LoadView, you need to set up an account and familiarize yourself with the platform. Follow these steps to get started:
1. Setting Up Your LoadView Account
-
- Sign Up: Visit the LoadView website and sign up for an account. You can start with a free trial to explore its features.
- Choose a Plan: Select a subscription plan that fits your testing needs. LoadView offers various plans based on the number of virtual users and test duration.
- Dashboard Overview: Once logged in, you’ll be greeted with the LoadView dashboard. Take a moment to explore yourself with the intuitive interface.
2. Creating a New Load Test
-
- Once your account is set up, you can create a new load test.
- Create New Test: Click on the “New Test” button on the top-right of the dashboard.
- Test Name: Provide a meaningful name for your test for easy identification.
- New Target: The click on the “New Target” button to select your load testing type.
- Test Type: Select the type of test you want to conduct. LoadView offers several options, including web applications, websites, APIs, and streaming media.
Configure Your Load Test
Configuring your load test correctly is crucial for obtaining meaningful results. Here’s how to set it up step-by-step.
1. Define the URL
-
- Load Test URL: Define the URL of your website or application that you want to load test after selecting a load testing type.
2. Defining User Scenarios
-
- User Scenario: Define the user scenario you want to test. For example, if you’re testing an e-commerce site, your scenario might include searching for a product, adding it to the cart, and checking out.
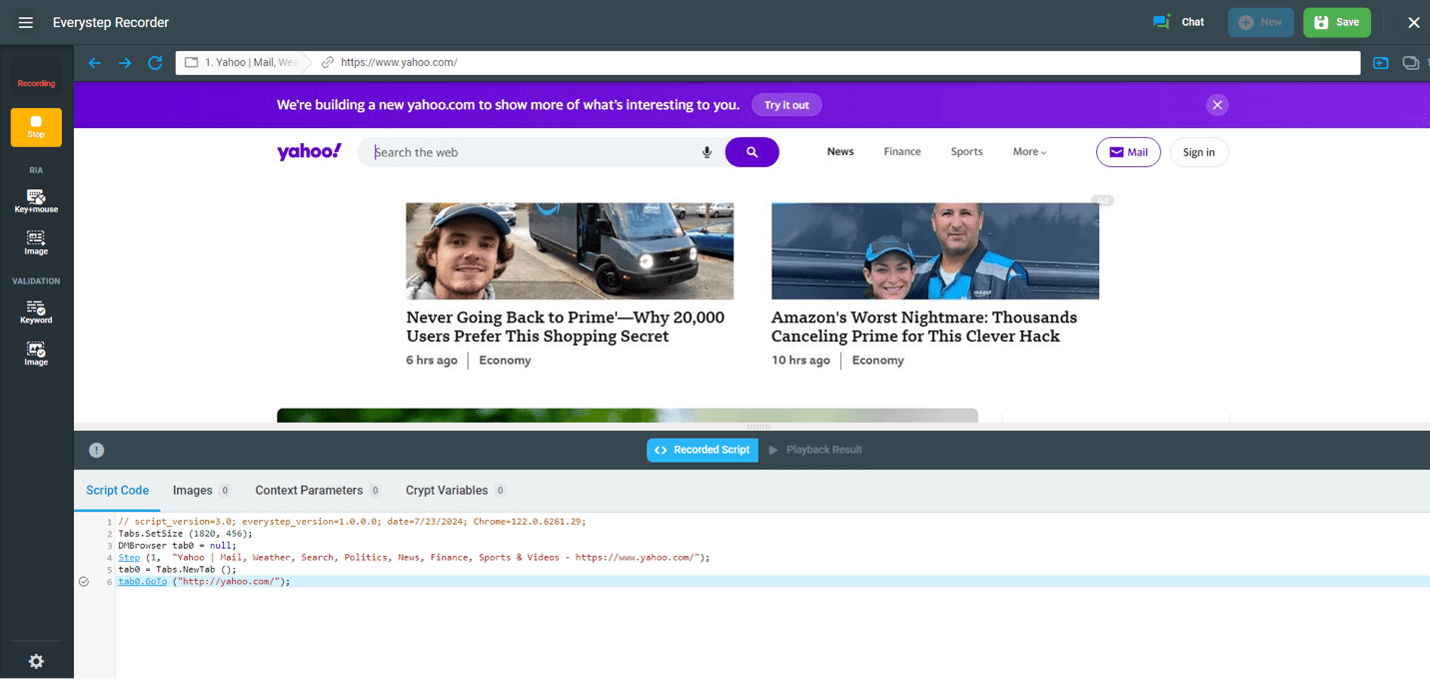
- Recording Script: LoadView allows you to record a script of user interactions using the built-in EasyStep Web Recorder. If you’ve selected any of the real browser testing options, you’ll be able to enter the URL of what you’re testing and then follow the steps to record the user actions that you want to test. Once done and after you have saved the user actions, it will save the script.
3. Setting Load Parameters
-
- Set Up Initial Settings: You’ll want to define some of your initial load test settings and some advanced settings before creating your test. After your settings established, you click “Create Test.”
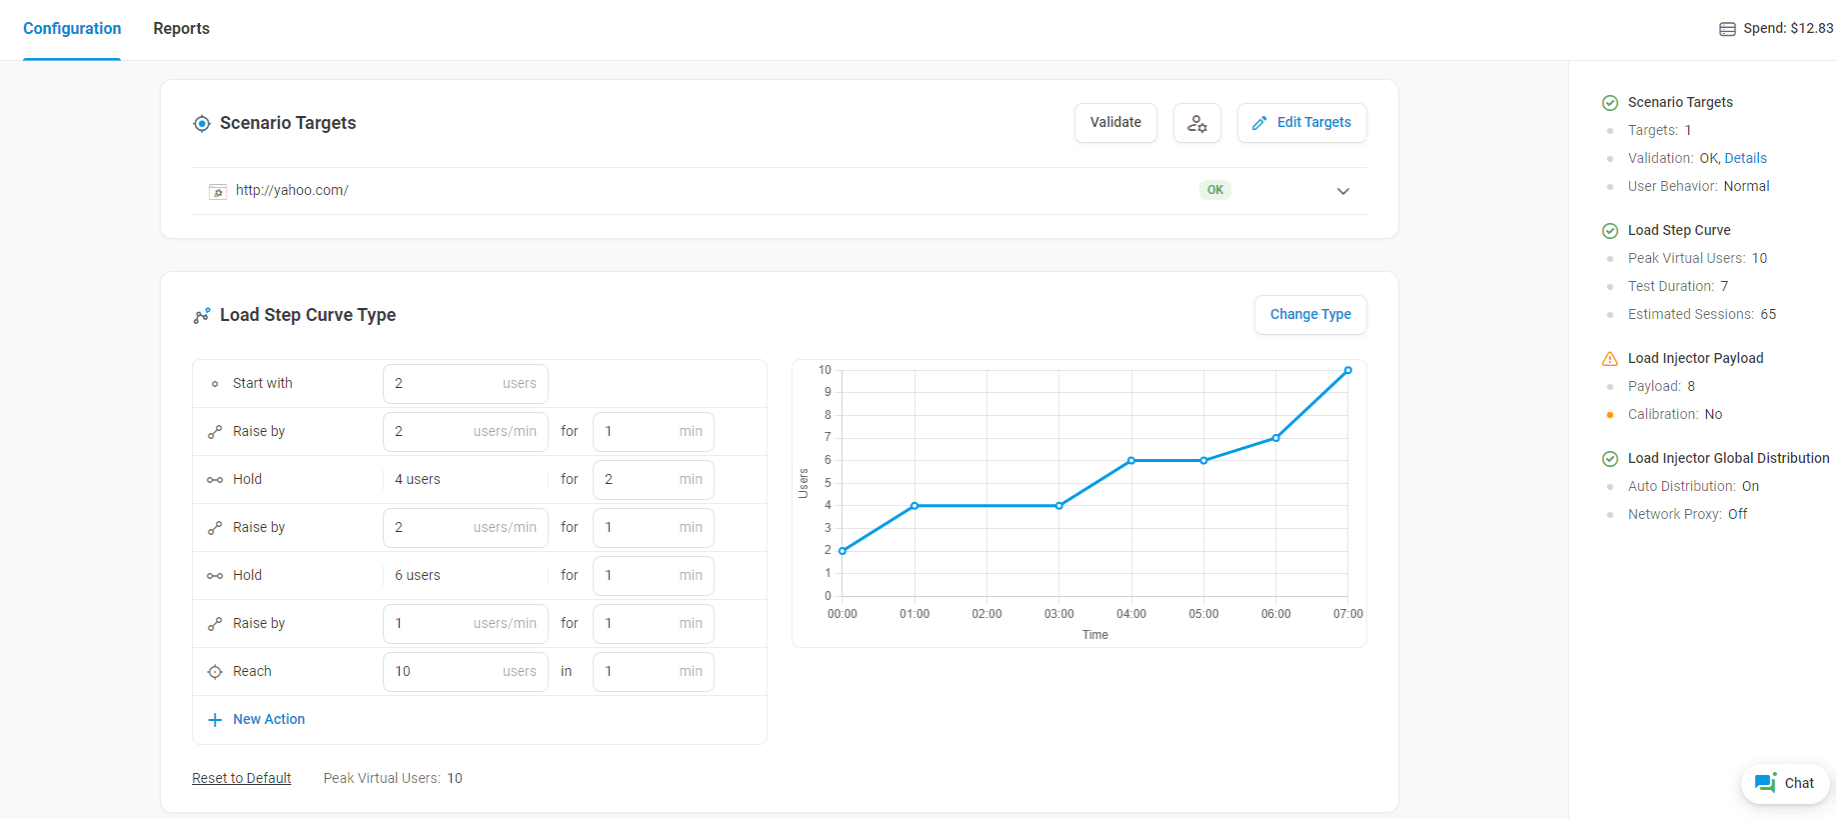
- User Load: Specify the number of virtual users to simulate. This will depend on your application’s expected traffic. Start with a moderate number and scale up as needed.
- Ramp-Up Time: Define the ramp-up period during which virtual users gradually increase. This helps identify how your application handles a gradual increase in load.
- Load Distribution: Choose how the load will be distributed. LoadView allows you to simulate traffic from multiple geographic locations, which is essential for global applications.
Running Your Load Test
Once your load test is configured, it’s time to run it.
1. Test Configuration Review
-
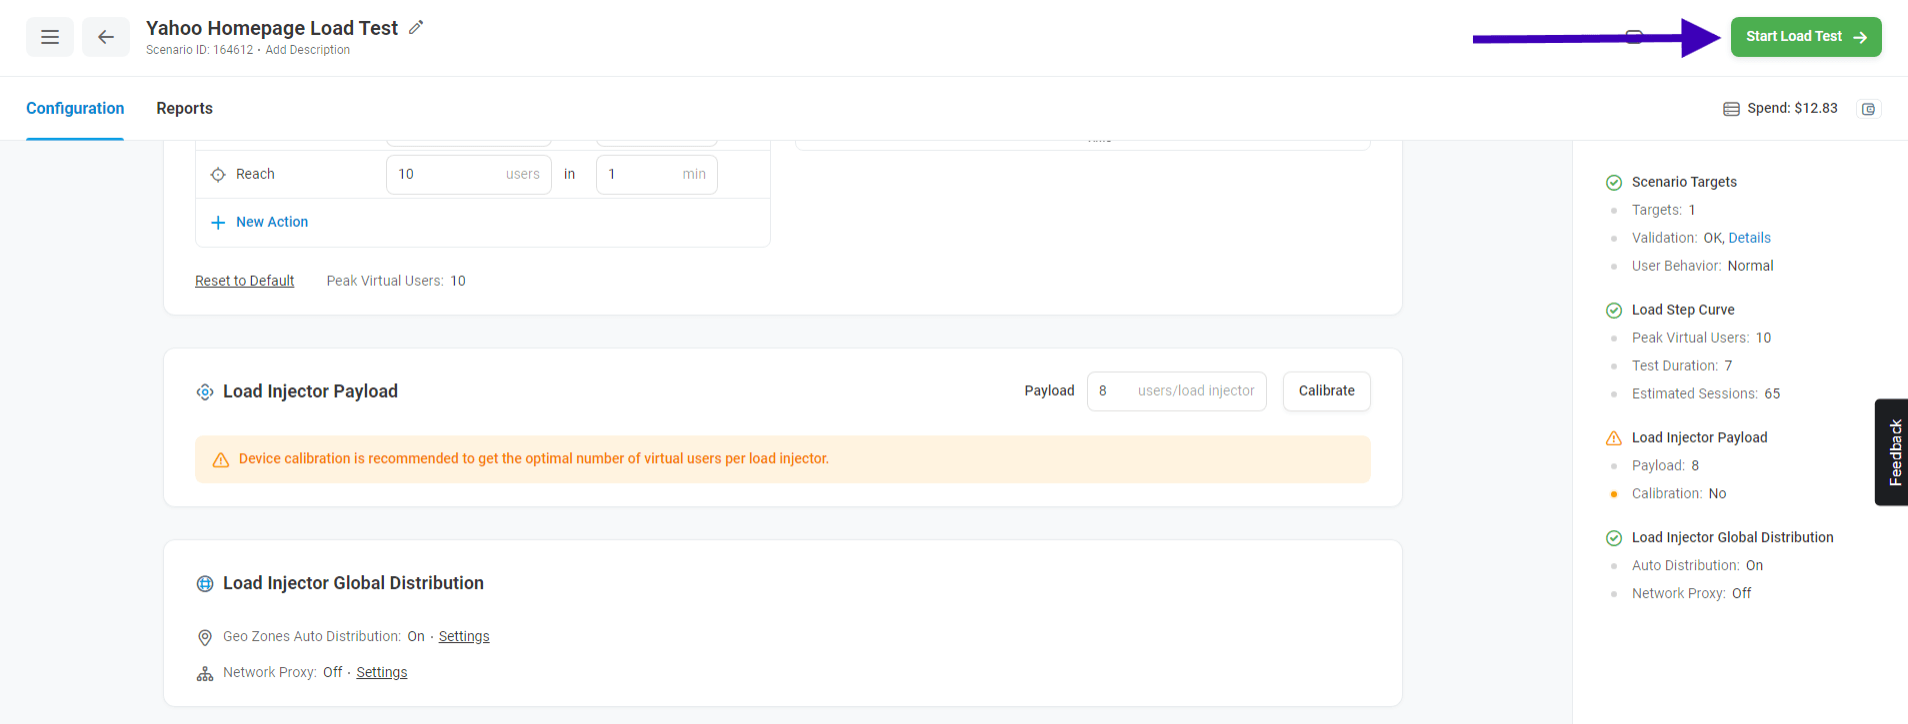
- Before starting your load test, review your test configuration and settings to ensure everything is set up correctly. You’ll want to verify the user scenarios, load parameters, and advanced options to avoid any issues during the test execution.
2. Start the Test
-
- Start Test: Click on “Start Load Test” in the top-right to begin. LoadView will start generating load according to your configuration settings.
- Monitoring: During your load test, don’t forget to monitor the real-time dashboard to observe how your application is performing. LoadView provides live metrics on response times, error rates, and more. Pay attention to any spikes in response time or error rates that could indicate performance issues.
Analyze Your Results
After the test is complete, analyzing the results is crucial to understanding your application’s performance and identifying areas for improvement.
1. Understanding the Report
-
- Summary Report: LoadView provides a summary report with key metrics such as average response time, error rate, and throughput. This gives you a high-level overview of your application’s performance.
- Detailed Metrics: Dive deeper into detailed metrics like response times for different user scenarios, load distribution, and browser performance. Examine these metrics to get a comprehensive understanding of how your application behaves under load.
2. Identifying Bottlenecks
-
- Slowest Transactions: Identify the slowest transactions in your user scenario. These are often the areas that need optimization. For example, a slow checkout process on an e-commerce site could lead to cart abandonment.
- Error Analysis: Analyze any errors that occurred during the test. Understanding the type and frequency of errors can help you pinpoint the root cause. Look for patterns or specific actions that trigger errors.
- Performance Trends: Look for performance trends over time. For instance, if response times increase significantly during peak load, it might indicate potential scalability issues. Use these trends to predict future performance under higher loads.
3. Recommendations and Optimizations
Based on the analysis, you can make informed decisions to optimize your application.
-
- Server Scaling: If your application struggles under load, consider scaling your servers. This could involve adding more instances, using load balancers, or upgrading your existing infrastructure to handle increased traffic.
- Code Optimization: Optimize your code to improve performance. This might involve refactoring inefficient code, optimizing database queries, or improving caching strategies to reduce server load.
- Content Delivery Network (CDN): If your application serves a global audience, using a CDN can significantly improve performance by reducing latency and load times. CDNs cache content at multiple locations worldwide which delivers it more quickly to users based on their geographic location.
- Database Optimization: Review your database queries and indexes. Slow database performance can significantly impact your application’s overall performance. Optimizing queries and adding appropriate indexes can reduce your load times and improve response times.
- Front-End Optimization: Minimize the size of assets (like images, CSS, and JavaScript files) and use techniques like lazy loading to improve your front-end performance. Optimizing the front-end can reduce load times and improve the user experience.
Best Practices for Load Testing with LoadView
To get the most out of LoadView, follow these best practices:
-
- Start Small, Scale Gradually: Begin with a smaller load and gradually increase it to understand how your application performs under different conditions. This approach helps in identifying performance bottlenecks at lower loads before they become critical at higher loads.
- Test Regularly: Make load testing a regular part of your development process. This ensures your application can handle growth and unexpected traffic spikes. Regular testing helps in identifying performance degradation early, allowing you to address issues promptly.
- Simulate Realistic Scenarios: Ensure your user scenarios are as realistic as possible to get accurate insights into user experience. Simulating real-world usage patterns helps in identifying potential issues that users might face.
- Analyze and Act: Don’t just collect data—analyze it and make necessary improvements based on your findings. Use the insights gained from load testing to optimize your application continuously.
- Collaborate with Teams: Share the load testing results with your development, QA, and operations teams. Collaboration ensures that everyone is aware of potential performance issues and works together to address them.
- Automate Load Testing: Integrate load testing into your CI/CD pipeline. Automating load tests ensure that performance testing is done consistently with every code change, reducing the risk of performance issues in production.
Conclusion
Conducting load tests with LoadView is a powerful way to ensure your web applications, websites, and APIs can handle the demands of real-world traffic. By following this step-by-step guide, you can set up, run, and analyze load tests effectively, gaining valuable insights into your application’s performance and making informed decisions to optimize it. Regular load testing helps ensure a smooth user experience, maintains high performance, and contributes to the success of your digital initiatives.
Next Level
Experience unparalleled features with limitless scalability. No credit card, no contract.


