One fine Sunday evening, our favorite television series comes back with its latest season, and here we get ready to jump on it to consume the much awaited series first before any spoilers hit us. For consumers, it has become so easy to grab their phone and enjoy content at mobile applications or web applications. Streaming media is accessible with only a few clicks and taps. Open the app and hit play. Simple, fast and instant, right?
On-demand video and live streaming consumption has become pervasive all across the globe. Everyone is moving away from DVDs, cable providers, and replacing it with on-demand video streaming subscriptions. With this boom in demand, consistent high performance and quality become a topic of concern. None of these on-demand platforms would want to see their consumers have a dull experience. But to make sure users get this streaming media available seamlessly with less buffering, highest quality, we definitely have to load test these media content with tons of users present at different geo-locations and streaming content for a long time. Even a slightest delay in media or quality can hamper customer experience and can close down user base.
Streaming Media and Key Load Testing Metrics
Let’s first discuss key important metrics that impact performance of streaming media.
Bit Rate
Bit rate is usually calculated with Average bytes per data transferred to the user, Higher bit rate means the user is able to consume high resolution of content both in audio and visual graphics. We may sometimes face latency when location difference between place from content getting fetched(Streaming media servers) and users are at different geographic locations, which affects overall bit rate.
Play Rate
Play rate is used to calculate the number or percentage of users who actually played the video, If the bit rate is at lower end, we see a lower play rate as well. So both these metrics go hand in hand. If content doesn’t load within the initial 30 seconds, users tend to close the streaming service which usually accounts for high drop in Play rate.
Buffer Time
Buffer time is the time spent for the content to load, it depends on network latency and user data download speed. Buffer time calculation tells us the amount of time spent by the user to wait for content to load. Increase in buffer time can hamper overall user experience and he might even stop watching the content if it drops below a threshold. Buffering can also come into picture while playing video, usually after buffering completes media starts playing, the length of time between buffered content and media playback is called lag length. Lag length plays an important role while media is streaming, if lag length increases it affects overall streaming continuity.
Play Length Time
Play Length time is the time spent by the user consuming the content, it helps to understand how much time an average user spends on the platform and it also displays the user’s overall experience and interest in the streaming video. If lately our play length time decreases, it’s high time for improving media content over the platform.
Lag Ratio
Lag ratio is the amount of buffering time over actual content viewership spent by the user. It helps to calculate the overall quality of streaming media. It should be as close to zero, but it can’t reach zero. There will always be some initial lag, but the consistency and continuity of streaming media for long should be maintained to get higher play length time.
As we discussed these above metrics, they help us to monitor how media applications are behaving under load. These are also used as metrics to improve the overall performance.
Why Do We Need to Test from Different Geographic Locations?
Before we even answer why we need to test with different geo-locations, let’s discuss more in layman’s terms how the request is processed. When the user clicks on the Play button, a request is sent to your internet service provider (ISP). The ISP forwards it to the dedicated servers that handle the website, and the servers provide a response which is relayed back to your computer and forms the result. For bigger giants providing streaming media where millions of hours of video content is relayed across the internet between their servers and all the users, a much larger network of servers is needed to maintain performance.
But what if your users are sitting in Los Angeles trying to stream content which is available at servers in Asia. This increases latency and might impact overall media performance. To solve this problem, stream providers use Content Delivery Networks (CDNs), which takes the original website and the media content it contains, and copies it across hundreds of servers spread all over the world. So when, say, users log in from Budapest, instead of connecting to the main server in the United States, it will load an exact copy of it from a CDN server that is the closest to Budapest. This greatly reduces the latency — the time taken between a request and a response, and everything loads really fast.
How Many Users Can My Stream Handle?
Before actual users arrive on the platform, we want to load test the streaming media to deduce what size of user base separated at different locations our streaming media is able to manage with highest value of bit rate, play rate, and lowest value of buffering and lag ratio. To get the number of users we would need a script which starts with x number of users browsing on the streaming media and we would need to ramp up or increase the users count gradually until we start seeing connection timeouts or drop in average bit rate. Increasing concurrent users and tracking connection timeout would give us the result of what would be the highest number of users count our current infrastructure can handle.
Planning and creating a script that mimics close-to-real-time user behavior on streaming media is a very important part of getting accurate results. We would even need a dedicated tool which is able to generate the load and make sure the script doesn’t break. We will look at LoadView to test the exact use case and understand how it helps to test over 100 different media streaming codecs.
Now we need to load test these CDN execution and speed and see if we face any latency because of it, while running streaming media with a large set of concurrent users. This will help us to understand with increased user base from different user locations as compared to where the contents reside on the server, we test the performance metrics and give us the closest to real time scenario.
LoadView & Features
LoadView is a Software as a Service (SaaS) application that provides load testing tools and support to run cloud-based load tests for web pages, streaming media, back-end API servers, and other complex web applications.
To help us manage and run performance runs for streaming media, LoadView provides infrastructure and test script to load test our streaming media to see how many concurrent streams our infrastructure can handle. It supports 100+ Media Stream Monitoring Codecs and media stream file formats, which provides a range of audio, video codecs based on our media under test.
LoadView has multiple options to test streaming media, one is a dedicated test where we need to pass the streaming media URI and the other involves using the EveryStep Web Recorder to record all the overall browser user sessions with media, which helps the recorder to create a script and rerun during load test at higher scale.
Features of LoadView
Connection Time
It provides real-time reports with connection timeout counts to show how the infrastructure behaves under the current number of concurrent users.
Frame Rate
It provides details like Frame rate which ensure the rate at which the images in videos are displayed and check whether they are not causing flickering or viewing errors.
Buffering Time
Helps us to understand values of bounce rates and viewer times high with buffering time thresholds and alerts.
Average Bytes Per Second
LoadView monitors image quality in the output of our streaming media or videos sharing metrics like bit rate which is getting consumed by the user.
Load Test Streaming Media Using LoadView
As we discussed above, LoadView provides two options to load test our streaming media, one with a dedicated streaming media URI where we pass in static media URL to run load test, and another with the script recorder which captures real-time browser interaction with media and records all the actions carried out by the user to create a script. This recorded script gets used to run load tests at a higher scale.
We will be discussing, step-by-step, the setup for both the different ways, as well as executing load tests for our streaming media using LoadView, which provides support for all the popular media stream file formats.
LoadView Streaming Media Configuration
To create a streaming media load test script, we would need a target of streaming media which we want to validate under heavy load. We would be required to enter the streaming media URL and the protocol path of media, which would be the media resource URI. We would be specifying both in our test scenarios. The overall steps involved while running load test for streaming media includes the below steps:
Streaming Media Configuration: Step 1
User enters streaming media URL and media type.
Streaming Media Configuration: Step 2
Based on the media under test, load generators will try consuming by fetching the content from Stream media URL.
Streaming Media Configuration: Step 3
Streams have multiple attributes like quality, codecs, video, audio which would be fetched from server and metrics for each attribute will be calculated while test run.
Streaming Media Configuration: Step 4
There is a connection timeout which would be mentioned in the test scenario, if the streaming media server is not able to send content within stipulated timeout threshold, an error will be generated which would be available in test results.
LoadView Media Streaming Performance Test Setup
Let’s look at the steps needed to run a streaming media load test.
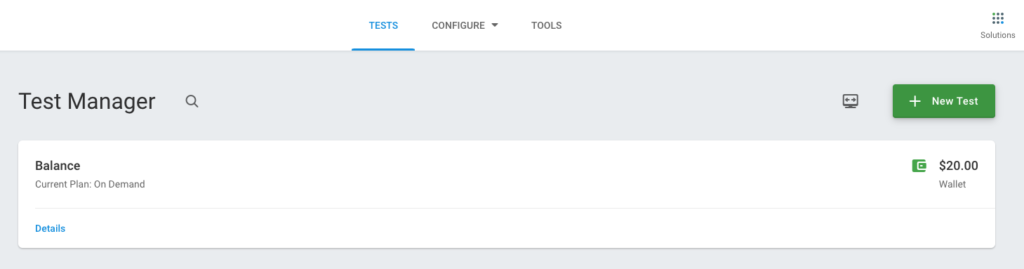
Create New Test
Open the LoadView testing homepage. We may need to click on New Test to begin creating our new load test.
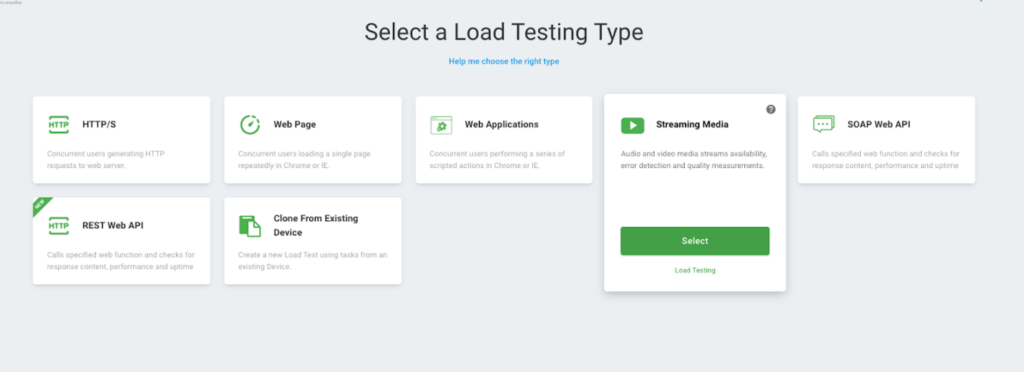
Select Load Testing Type
We would see all different types of load tests supported by LoadView like Web Applications, Web Pages, Streaming Media, HTTP/S, among other option. For our use case, select the Streaming Media option to run our load test.
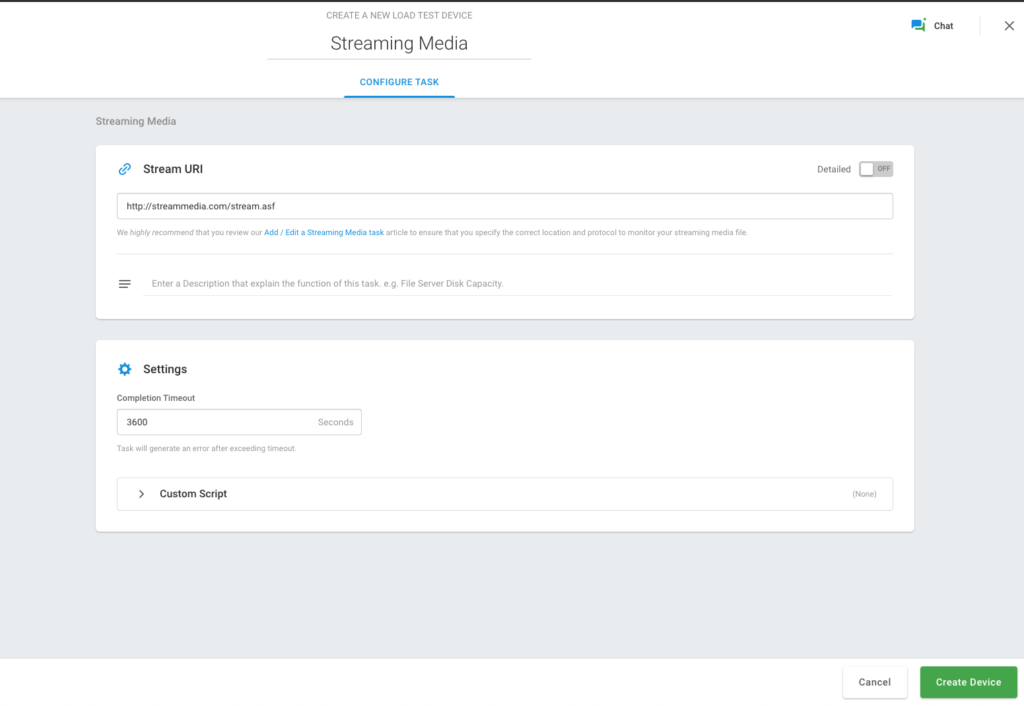
Streaming Media Configure Task
After choosing Streaming media, we would need to enter details for the application under test like media type and streaming media URL. We would also need to enter timeout for the application under test. If due to some reason, the application becomes unresponsive, LoadView would wait for the set interval and later would end the test with appropriate error details. Once updated, we need to click the Create Device button.
Test Scenario Configuration
Once the device for which would be running the load test is configured successfully, we would be redirected to the Test Scenario screen, which provides multiple options based on the test run required. Fields like Concurrent Users, Ramp Up time, Ramp Up speed, Warm Up time, and Geo-distribution for our load test can be defined on the Test Scenario screen. These values depend on type of applications and can be set as per the load test requirement.
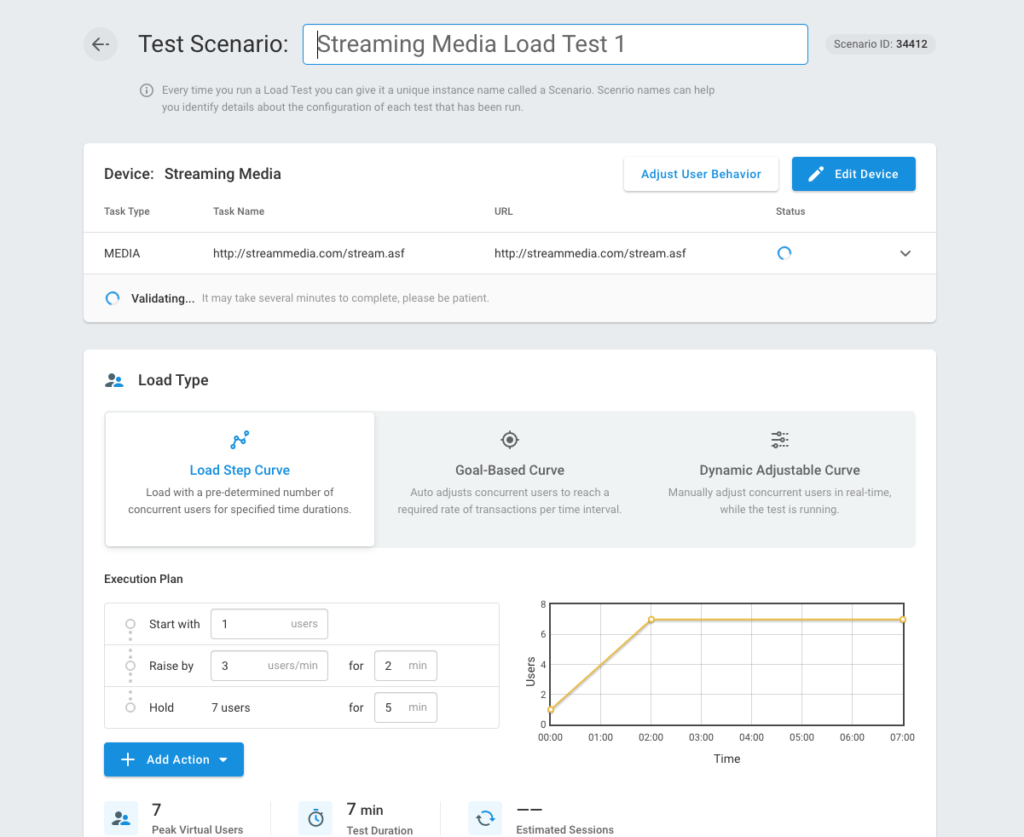
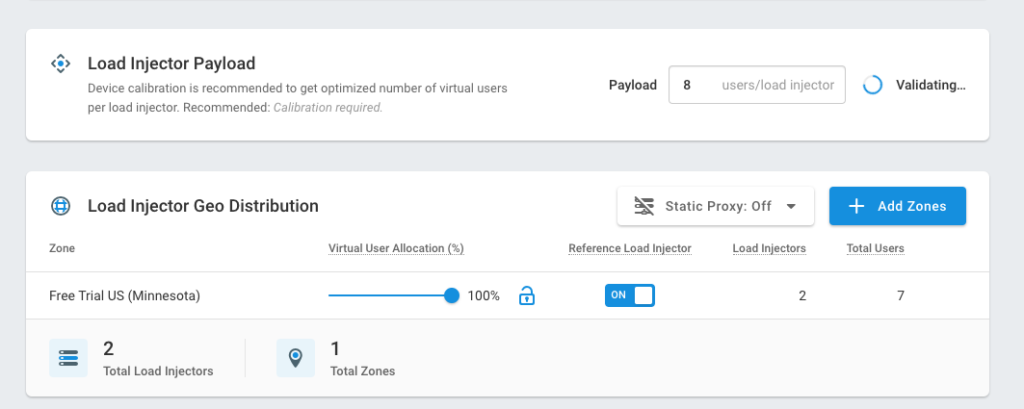
Streaming Media Concurrent Users
On the Test Scenario screen, we would need to add the number of concurrent users required to run load test. Load injectors would be initiated based on the load and concurrent users required for test run. Upon successful completion of our load test, detailed analysis and reports would be generated which will help to gauge and find any performance loopholes, as well as how the system behaved during our test run.
Connection Time
Connection time is the time difference between initiating a streaming session with playback of the first frame of streaming video. This time gets added to our metric lag ratio discussed earlier.
Duration
Duration is the total time value for which content is consumed by the user, it also describes time taken by the engine to capture content.
Quality
Quality is calculated by how much bits rates consumed by the user which helps to understand visual representation of the streamed media.
Frame Per Second
Frames per second helps us to calculate the number of frames downloaded over test run carried out.
Load Testing Streaming Media With The EveryStep Web Recorder
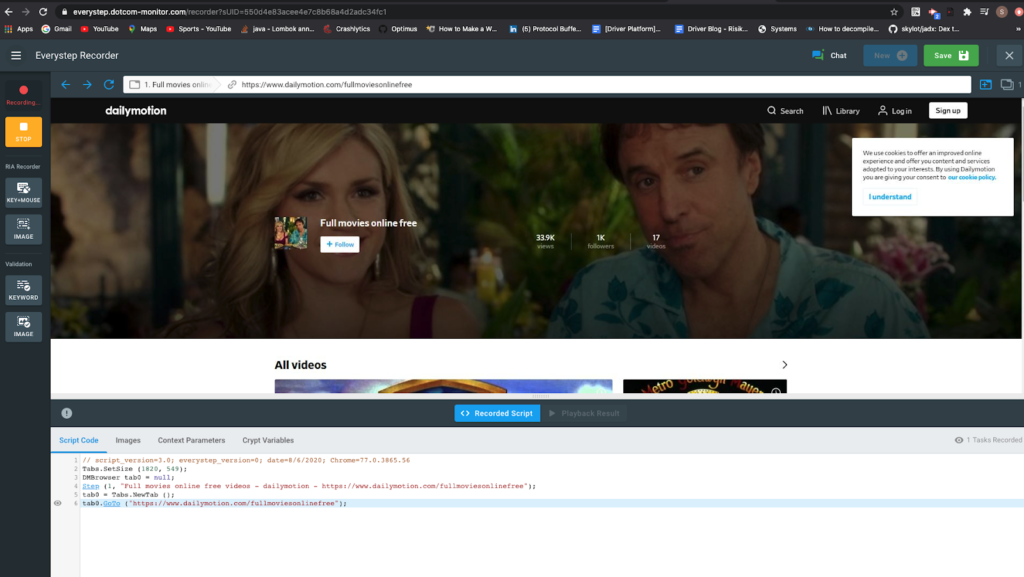
This section helps us to understand how we can load test real browser sessions having streaming media with the usual website content. The EveryStep Web Recorder provided with LoadView can be used to create test scenarios based on real user behavior over a web application having content, where it involves audio, video consumption, play/pause of video, compact or expanded video media player streaming. The script recorder records all the actions and helps rerunning the user experience at larger scale to get the close to real performance results from the web application. The recorder supports all prominent browsers to help us give load test results based on different browsers. We can modify and configure scripts created by EveryStep while recording as per our requirement. It helps us scale and work with multiple web applications using Flash, JavaScript, WebSockets, HTML5, Java, PHP, Ruby, Silverlight, and more. The setup is similar to the above-mentioned steps, but varies slightly when using the EveryStep Web Recorder. The steps for setting up a load test with the script recorder is as follows:
- Create a new test on LoadView and choose the Web Applications option.
- We would be redirected to the Record browser window, where we can choose various browsers and application URLs. Enter the applications details and click Record.
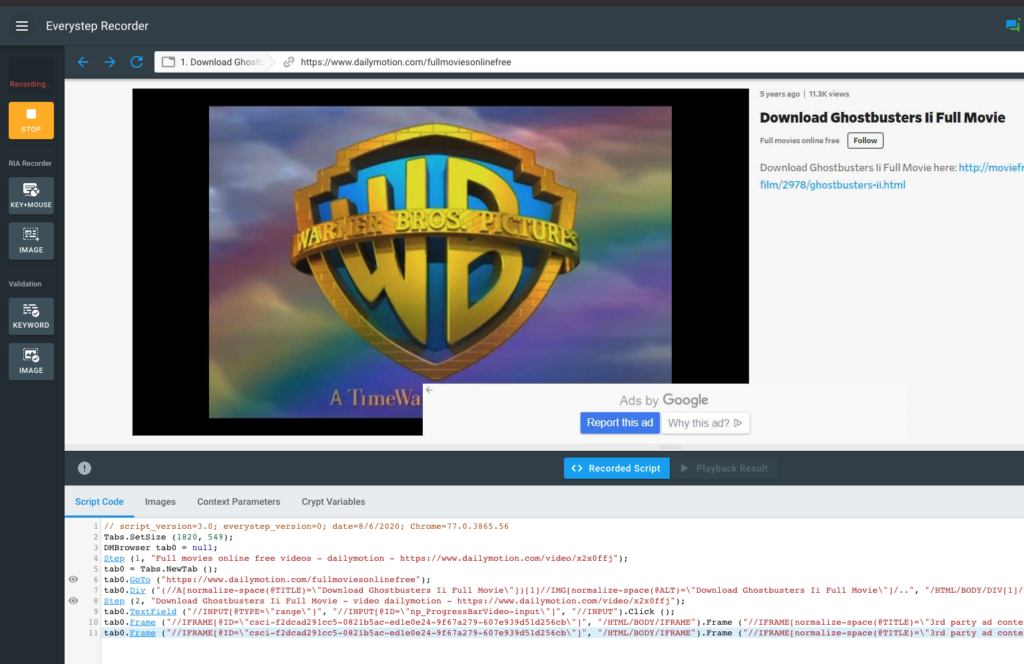
- Once the recording is ready, we can browse the web application as an end user would and the script recorder will help us generate a script which could be played again using the same steps followed by us.
- We can set up delays to the script created by right-clicking on the last script line. This delay will help test scenarios to wait for the media.
- Once we are done, we can click Create Script and would be redirected to the Test Scenario screen, where we would be allowed to enter the geo-locations needed for our test, along with the number of concurrent users required for our test, and ramp up/ramp down speeds.
Conclusion: How to Load Testing Streaming Media: Servers, Scripts & More
With the recent demand of video and live streaming media, and traffic over these mediums, it challenges industries to deliver the best service and quality to stay in business. Making sure we stress out the streaming media in advance is a requirement and can’t be neglected. We looked at a step-by-step guide on how we can set up a test scenario and run load test our streaming media application using LoadView, which provides extensive support for audio, video codecs and multiple media format support. We also looked at approaches to load test out the application as per need. LoadView provides extensive support for streaming media content load test using the EveryStep Web Recorder and dedicate streaming media URI load test.
Learn more about load testing your streaming media and sign up for the free trial to get up to 5 free load tests.