

Modern web applications rely heavily on JavaScript. Frameworks like React, Angular, and Vue help teams build fast, interactive interfaces, but they also move more work into the browser. That means website performance is no longer just about server response time. JavaScript execution, rendering, hydration, API calls, third-party scripts, and client-side routing all affect how fast an application feels to users.
If a JavaScript-heavy application takes too long to load or respond, users may leave before completing the action you care about. That is why client-side performance testing should be part of any serious load testing strategy. You need to know not only whether the server can handle traffic, but whether the browser experience remains usable under that traffic.
Client-Side JavaScript Performance Is Critical
During JavaScript execution, browsers use CPU, memory, network resources, and main-thread time. These factors affect how quickly users can view content, interact with the page, and complete workflows. Performance can also vary between execution cycles, devices, browsers, and network conditions.
Because of this, client-side performance testing should be included in your test strategy. A good client-side performance testing tool can help identify JavaScript, rendering, and user-flow issues that protocol-only tests may miss. In this article, we’ll explain common JavaScript frameworks and show a step-by-step guide for client-side performance testing with LoadView and the EveryStep Web Recorder.
JavaScript Frameworks Explained
A major advantage of JavaScript frameworks is that they help developers build interactive interfaces, reusable components, and faster client-side experiences. In traditional websites, much of the content was generated on the server and returned to the browser on each request. Modern JavaScript applications often communicate with APIs, update the page dynamically, and render new states without full page reloads.
Modern JavaScript frameworks commonly support features such as:
- Component-based development for reusable UI elements.
- Efficient updates to the DOM when application state changes.
- Client-side routing for single-page application behavior.
- State management patterns for dynamic user experiences.
- Integration with APIs, authentication flows, and backend services.
Advantages of JavaScript Frameworks
The following are some of the advantages JavaScript frameworks provide for modern web applications.
Interactive User Experiences
JavaScript frameworks make it easier to build interactive features such as dashboards, filters, live search, carts, forms, charts, and real-time updates. These features can improve usability, but they also need to be performance tested because they add work inside the browser.
Reusable Components
Frameworks like React, Angular, and Vue encourage component-based development. This makes applications easier to maintain and can help teams reuse interface patterns across pages and workflows.
Strong Ecosystems
JavaScript is widely used across the web. These frameworks have large ecosystems of libraries, tools, documentation, and community support, which can speed up development and improve maintainability.
Reduced Full Page Reloads
JavaScript applications can update parts of a page without forcing a full reload. This can improve the user experience, but it also means performance depends on API calls, client-side state, rendering logic, and JavaScript execution.
Modern Interface Design
JavaScript can be used to create features that enhance the user interface and overall user experience. However, rich interfaces should be tested carefully because animations, large bundles, and third-party scripts can slow down real users.
Disadvantages of JavaScript Frameworks
Performance Overhead
JavaScript frameworks can add bundle size, rendering work, hydration delays, and main-thread activity. Poorly optimized applications may feel slow even when the backend responds quickly.
Security Considerations
JavaScript itself is not automatically insecure, but browser-based applications must be designed carefully. Teams need to protect against issues such as cross-site scripting, unsafe dependencies, exposed tokens, insecure API calls, and improper handling of user input. Disabling JavaScript is not a practical security strategy for modern applications. Secure coding, dependency management, and proper testing are required.
Comparison: React vs. Vue vs. Angular
React, Angular, and Vue are all widely used for building modern web applications. The right choice depends on project requirements, team experience, application complexity, ecosystem needs, and performance goals. Below is a practical overview of how they differ.
React
React is a JavaScript library for building user interfaces. It is commonly used for single-page applications, dashboards, eCommerce experiences, content platforms, and large-scale web applications. React’s component model and ecosystem make it a popular choice for teams that want flexibility and strong community support.
Advantages of React
React uses a component-based model that makes it easier to build reusable UI elements. Its ecosystem supports routing, state management, server-side rendering, static generation, and modern frontend tooling. React is flexible, but that flexibility also means teams need to make careful architecture decisions.
Disadvantages of React
React applications can become complex if state management, routing, data fetching, and rendering patterns are not managed carefully. Performance problems can appear through large bundles, unnecessary re-renders, hydration delays, and inefficient API usage.
Angular
Angular is a full-featured framework maintained by Google. It is commonly used for enterprise applications, internal tools, dashboards, and large applications that benefit from a standardized structure. Angular uses TypeScript and includes built-in patterns for routing, forms, dependency injection, and application architecture.
Advantages of Angular
Angular provides a structured framework with many built-in features. This can be useful for large teams that need consistent patterns, strong typing, and clear application organization. Angular’s tooling can help with maintainability, testing, and enterprise-scale development.
Disadvantages of Angular
Angular can have a steeper learning curve than lighter frameworks. Applications may also become heavy if modules, dependencies, and rendering patterns are not optimized. Performance testing is important for Angular applications because large bundles, change detection, and client-side rendering can affect user experience.
Vue
Vue is a progressive JavaScript framework that can be adopted incrementally or used to build full applications. It is often appreciated for its approachable syntax, component model, and flexibility.
Advantages of Vue
Vue is approachable for many developers and works well for both small applications and larger projects when structured properly. Single-file components, reactive data binding, and a flexible ecosystem make Vue a practical option for many teams.
Disadvantages of Vue
Vue may require more architectural decisions as applications grow, especially around state management, routing, build structure, and team conventions. As with any JavaScript framework, performance depends on how the application is built, bundled, rendered, and tested.
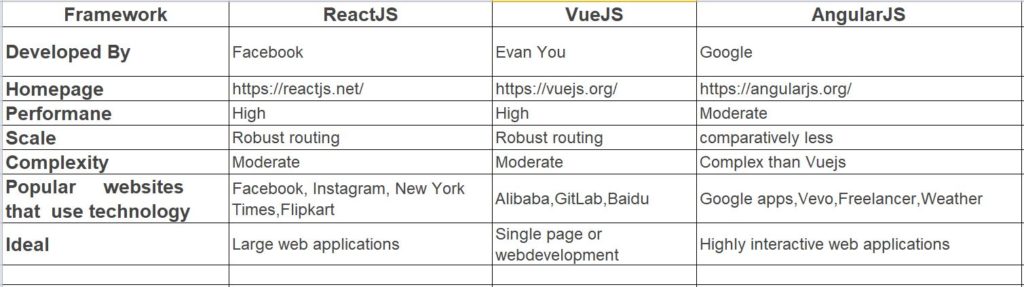
Side-by-Side Comparison: React, Vue, and Angular
The image below shows basic differences between the frameworks, along with performance criteria.
React vs. Vue vs. Angular: Additional Considerations
Stability
React, Angular, and Vue are all mature options. Stability depends less on the framework name alone and more on project structure, team experience, dependency management, release process, and testing discipline.
Compatibility
Angular provides a more complete built-in framework, while React and Vue rely more heavily on ecosystem choices. All three can support modern web applications, but teams should evaluate routing, state management, testing, build tooling, and integration needs before choosing.
Learning Curve
Vue is often considered approachable for developers getting started. React is flexible and widely documented but may require additional library decisions. Angular is more structured and can take longer to learn, especially for teams new to TypeScript or enterprise-style frontend architecture.
Setup Complexity
Setup complexity depends on the application and tooling. Vue and React can be quick to start for smaller projects, while Angular provides a more opinionated structure out of the box. For larger teams, that structure can be useful.
Community Support
React, Angular, and Vue all have active communities, documentation, and third-party tools. React and Angular are especially common in enterprise and large-scale environments, while Vue remains popular for teams that want a lightweight and approachable framework.
Framework Size
Bundle size varies based on framework, build tooling, dependencies, and application design. Smaller bundles can improve load time, but framework size is only one factor. Code splitting, lazy loading, image optimization, caching, and third-party scripts often have a larger impact on real user performance.
Complexity
For complex applications, the best framework is usually the one your team can build, maintain, and optimize consistently. React, Angular, and Vue can all support large applications when designed properly, but each requires performance testing to validate real user behavior under load.
License Requirements
React, Angular, and Vue are commonly available under permissive open-source licenses. Teams should still review license requirements and dependency policies as part of their normal software governance process.
Architecture
Angular provides a full application framework with opinionated patterns. React focuses on the view layer and is commonly paired with other libraries for routing and state management. Vue provides a progressive framework model that can scale from simple UI components to full applications.
Optimization Case Study
JavaScript-heavy sites can experience performance issues, especially around page load time, bundle size, third-party scripts, and client-side rendering. In industries such as automotive and electric vehicles, pages often include rich media, filters, listings, and technical details, which can create JavaScript-related bottlenecks. By using LoadView, teams can identify where scripts, rendering, and user flows slow down and then validate improvements with repeatable tests.
Performance Benchmarks: Angular vs. Vue vs. React
The image below represents several performance benchmark aspects, such as interactive time, script boot time, and memory efficiency.

JavaScript Startup Metrics, Stefankrause.net
Load Testing JavaScript Applications with LoadView
LoadView is a managed, cloud-based load testing platform that helps teams test websites, web applications, APIs, streaming media, and more. LoadView can test applications built with modern JavaScript frameworks such as Angular, React, and Vue. Because LoadView supports real browser-based testing, developers and QA teams can measure performance from the user’s perspective, including JavaScript execution, page rendering, authentication flows, and multi-step user journeys.
The following steps outline the process of load testing a modern JavaScript application. LoadView uses real browsers and supports JavaScript execution and authentication logic at the browser level. You can script user actions using the built-in EveryStep Web Recorder, then configure and run a load test without managing your own load generation infrastructure.
Step 1. Initial Setup and Using the EveryStep Web Recorder
The website we are going to test is histography.io. It is a JavaScript-based application that shows historical events in a single-page view.

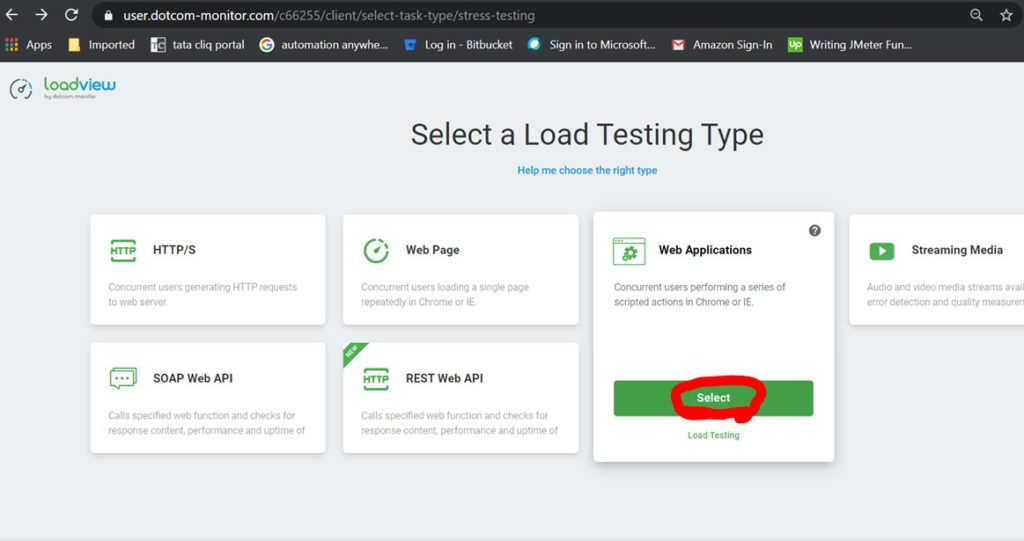
If you don’t have a LoadView account, you can sign up for the free trial. If you already have an account, log in to your account or launch the EveryStep Web Recorder to begin scripting. You can also click New Test from your account to open the recorder window. Select Web Applications.
Step 2. Enter URL and Record a New Script
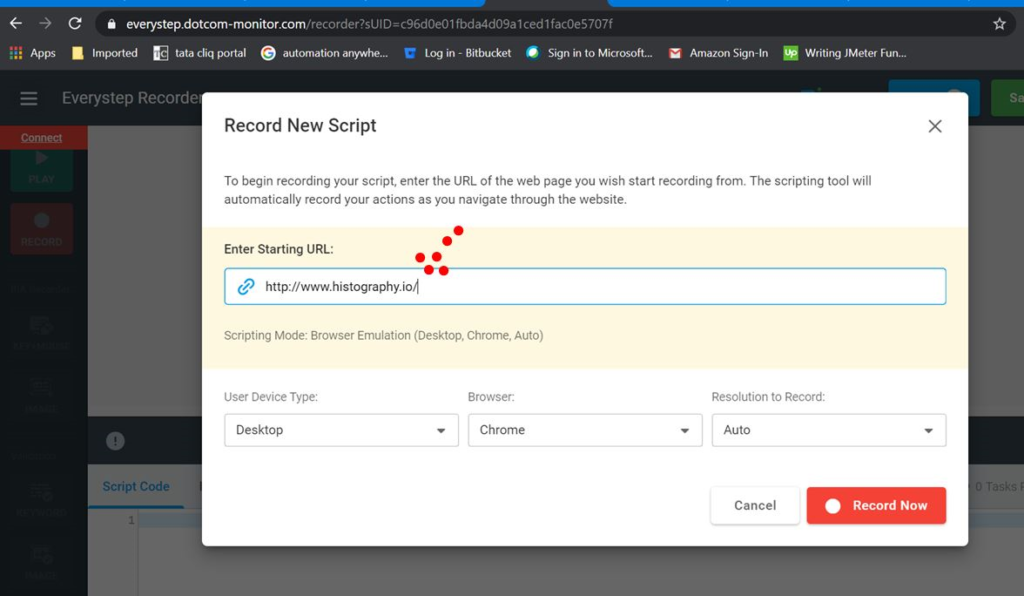
Once you click Web Applications, the EveryStep Web Recorder will start. Enter the address of the web application. In this example, it is histography.io. You can also toggle between desktop and mobile options based on your requirements. Mobile options include Android, iPhone, and screen orientation settings that imitate mobile behavior. Once you’ve entered the requirements, click Record Now.
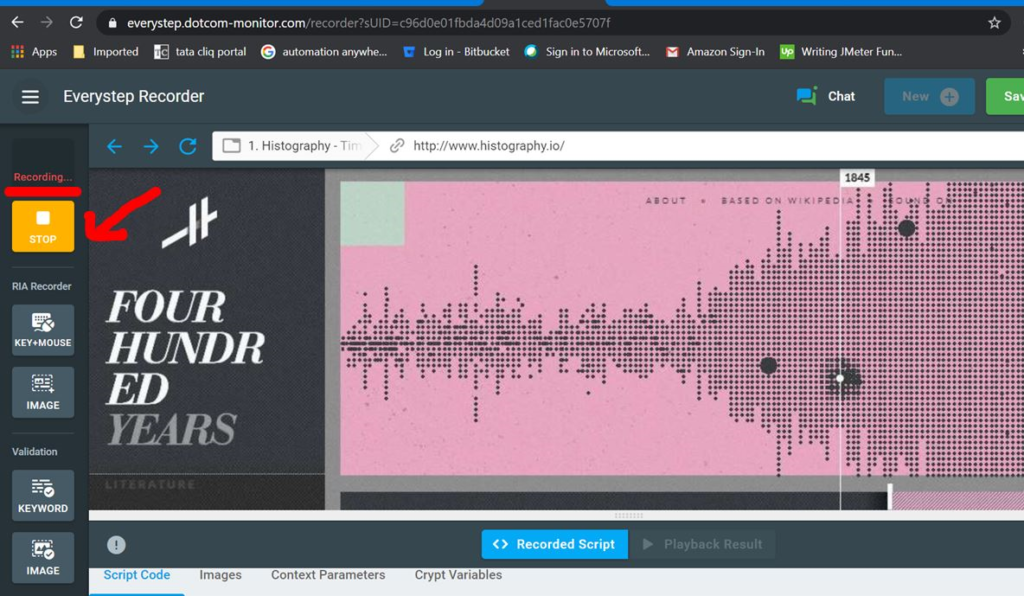
The recording will start, and you can navigate through the flow you want to include in your load test. In the script code section, you can see the recording details and modify the code if needed. You can add parameters such as delays, Crypt variables, network conditions, and more based on your test requirements.
Step 3. Complete Your Script
Click Stop once you complete the recording. Click Play Now to replay the script and confirm there are no errors captured during the recording. The script will replay the user path you recorded.
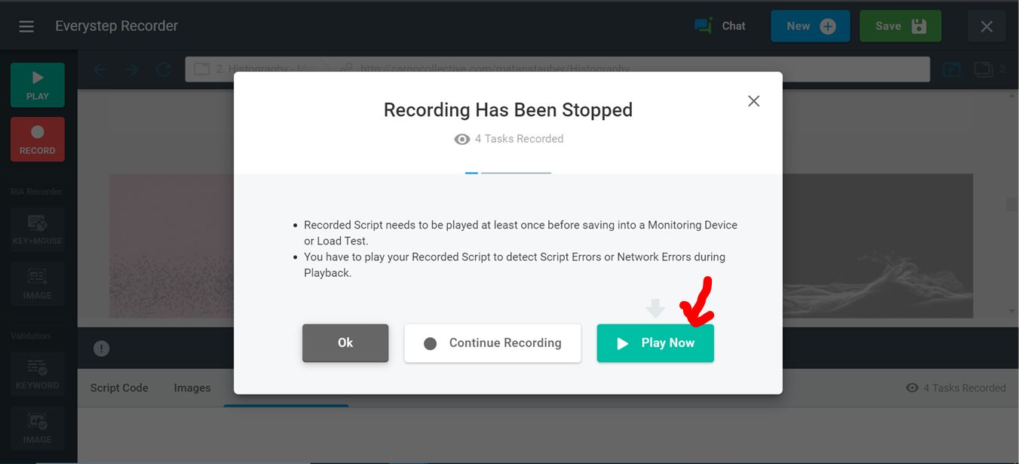
If there are errors in the script, you will see an error message. If there are no errors, you will see a success message. Save your script and modify it later if necessary.
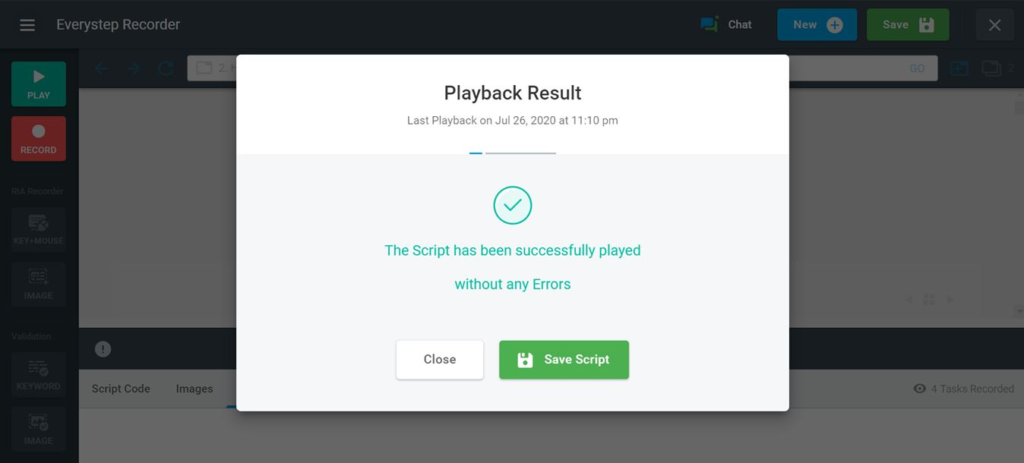
Recorded script details appear once you click Save Script. You can edit the script for further improvements.
- Add a Step: To add additional steps to the end of a script, press the record button and choose the option to continue adding steps.
- Modify a Script with Tools: To add new lines in the middle of a script using the wizard, right-click the script within the editing pane where you want to add a new line. The context menu with tools for adding new steps will appear.
- Edit Variables: To edit variables such as keywords, field values, usernames, or passwords, click the underlined field label and edit the value.
- Context Parameters: You can convert a script method parameter to a context parameter when needed.
For more information about editing a script, visit our Knowledge Base page.
Step 4. Create Your Device
Click the Create Device button to begin the test execution setup.
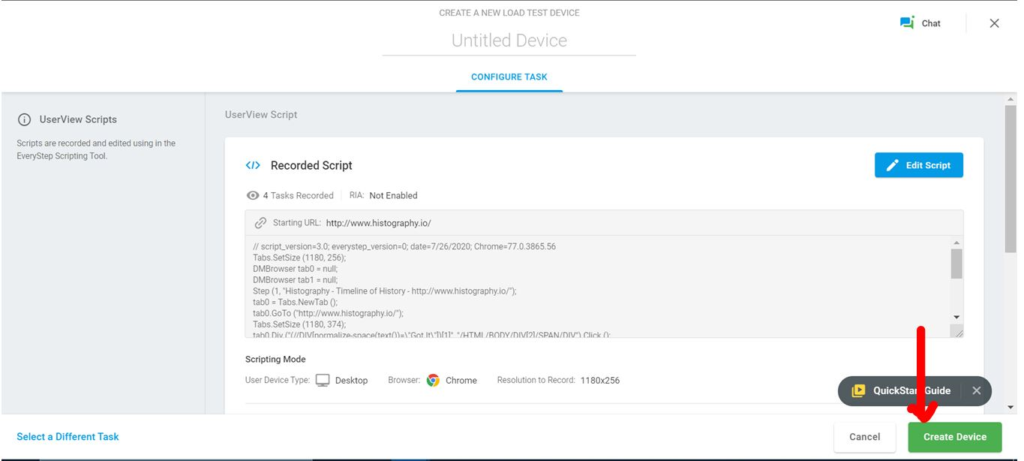
You can make any final changes before proceeding. Click Adjust User Behavior or Edit Device for further changes. Based on the number of users and duration, you can also review the estimated cost for the test execution.
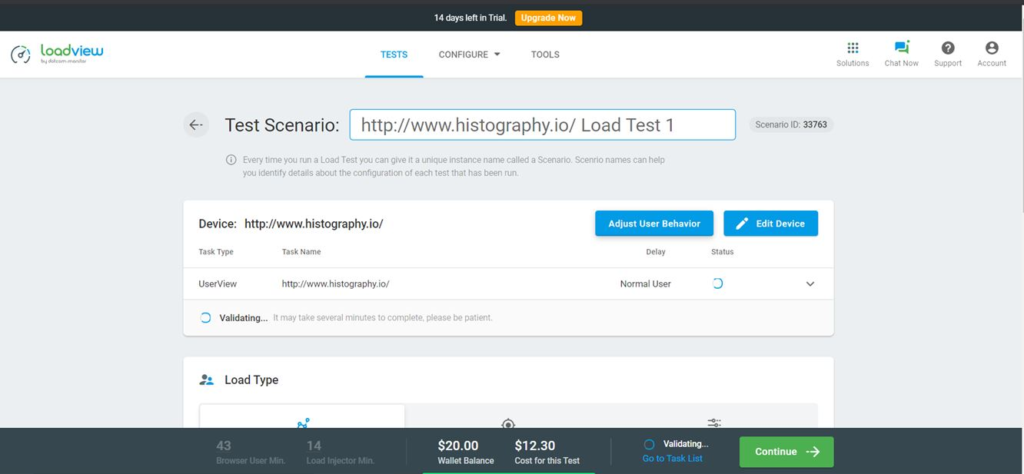
Step 5. Create Your Load Test
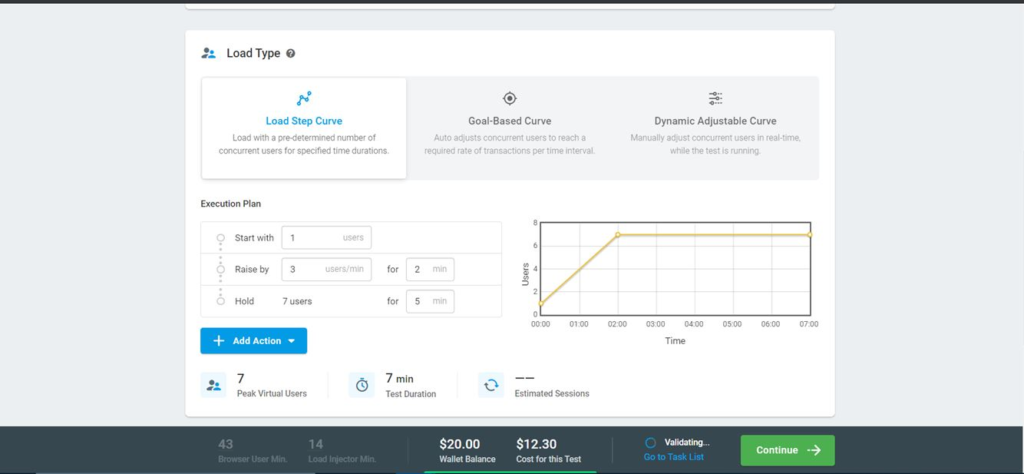
Choose the load curve that matches your requirements. LoadView provides options such as Load Step Curve, Goal-Based Curve, and Dynamic Adjustable Curve. The right curve depends on your performance goals, expected traffic pattern, and test scenario. For this example, we have chosen the Load Step Curve.
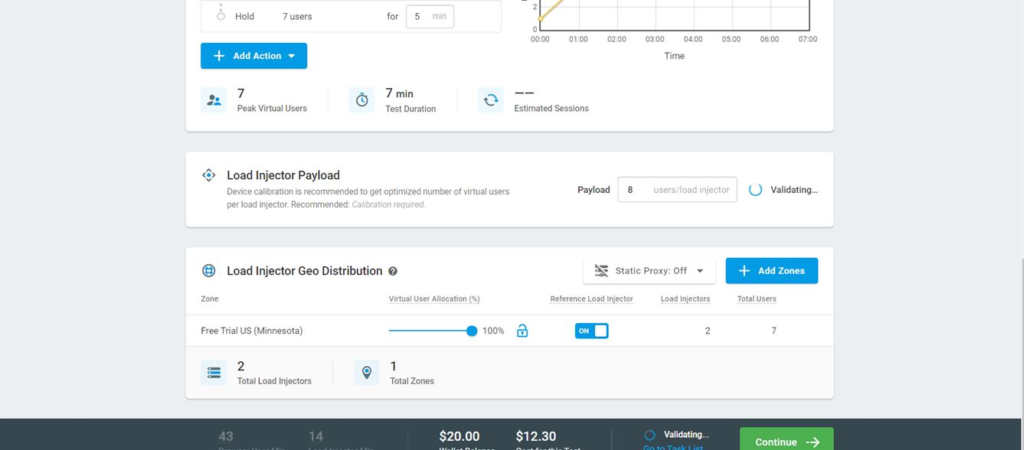
If customers around the world access your application, you can choose LoadView load generators based on user location. In this example, we have chosen Minnesota, but LoadView provides multiple locations to choose from. Based on the number of required users, you can choose the number of servers. Keep in mind that real browser and JavaScript-heavy performance testing can be resource-intensive.
Step 6. Start Your Load Test
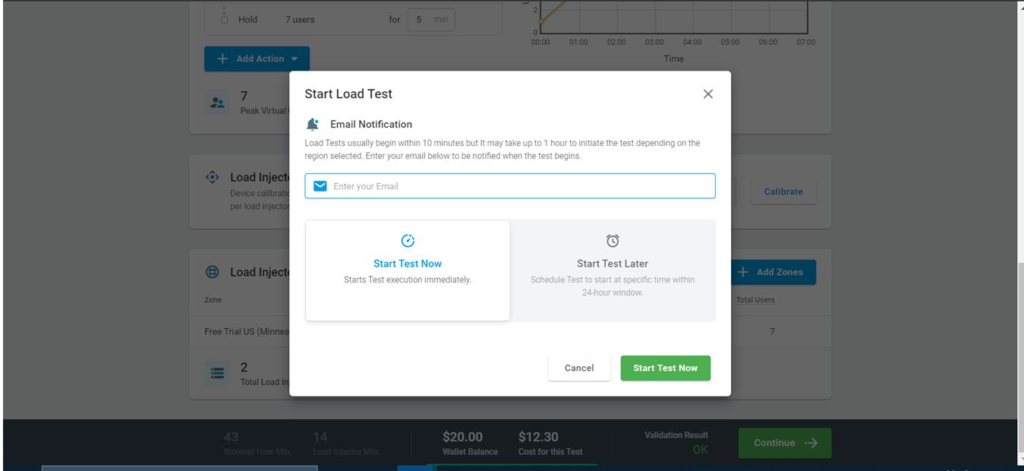
Once you have chosen the test type and servers, click Continue. You will be asked for an email address so you can be notified when the test is complete. Test results can also be sent to the owner of the LoadView account. You can start the test immediately or schedule it for later.
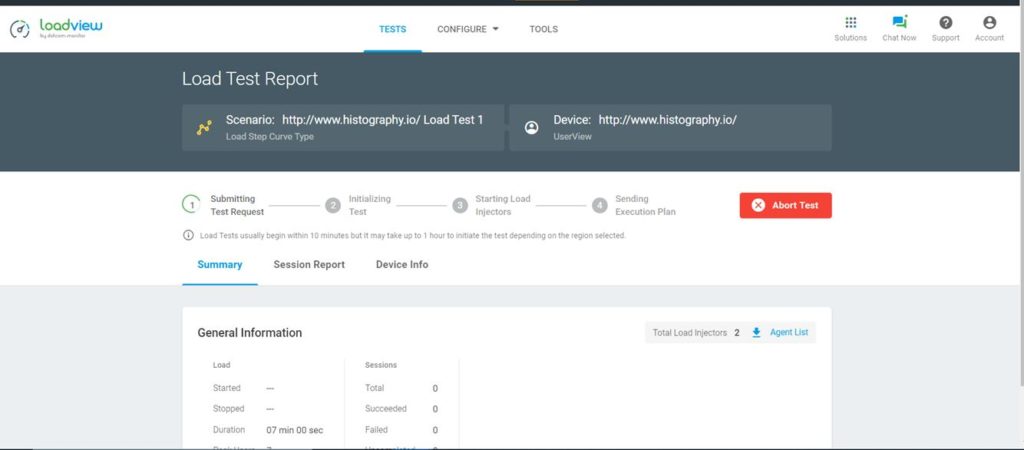
Once the test starts, you can see real-time information about the test status, servers, and scenario details. You can also cancel the test if you need to make a last-minute change. The initial status will show as submitted and then change to running once the test starts.
Step 7. Load Test Execution
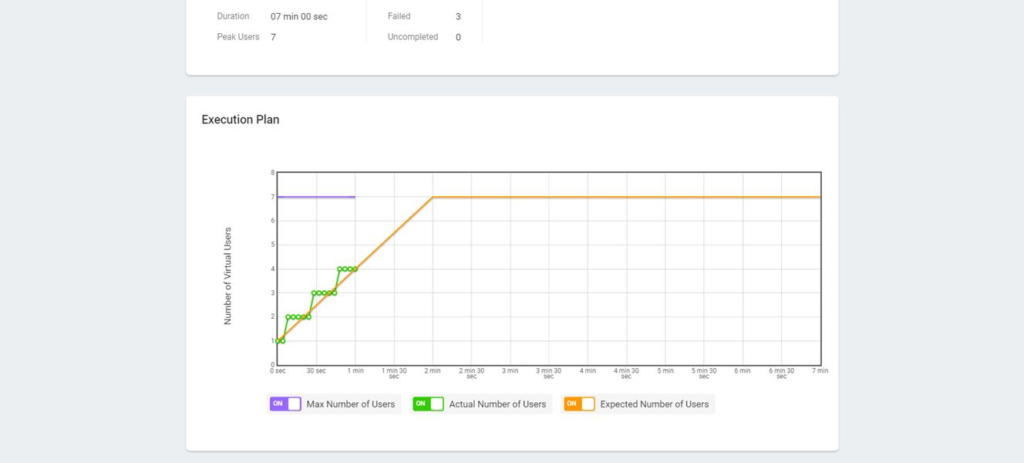
The execution plan graph is available under the Test Summary tab. It shows information such as the maximum number of users, actual users, expected users, and how the test load changed over time.
The average response time graph helps show how the application responded as user load increased. For JavaScript applications, you should review this alongside browser-level data, waterfall information, errors, and backend monitoring where available.
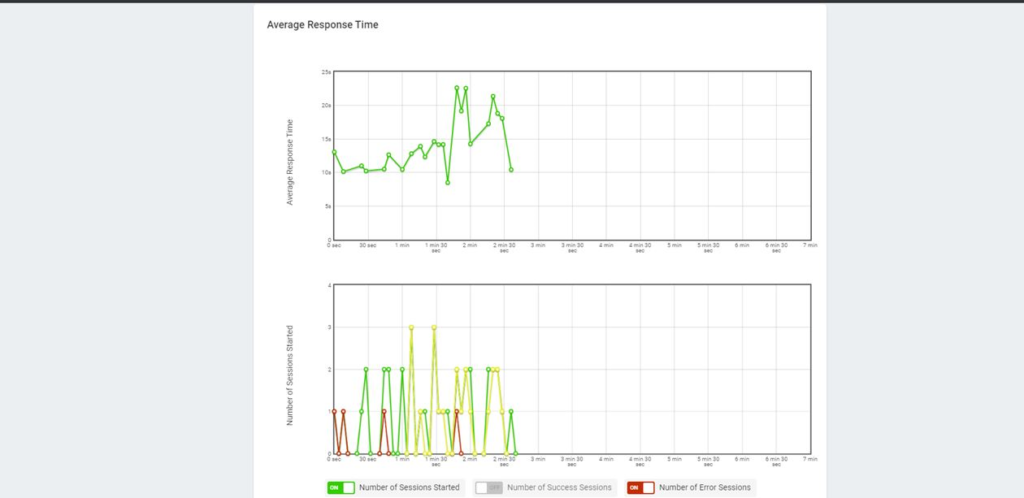
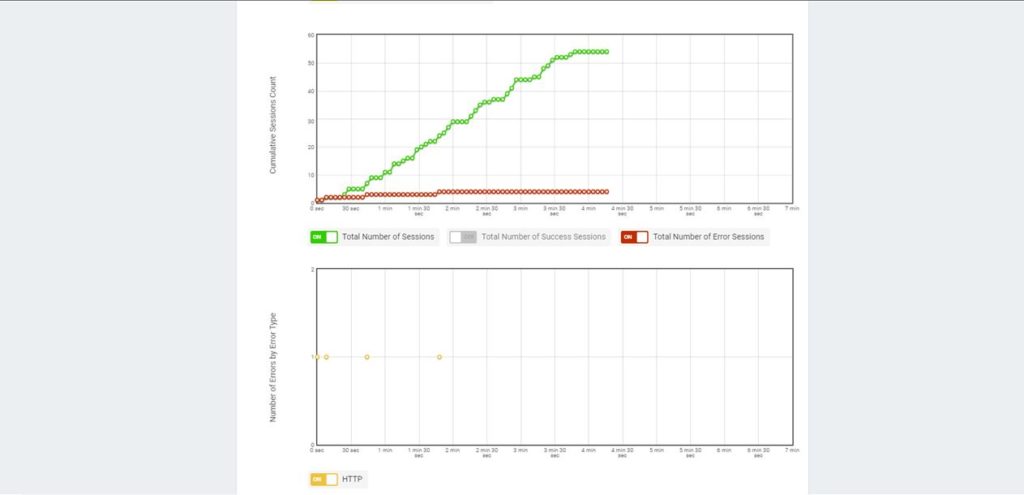
The success and error session graph shows how many sessions completed successfully and how many produced errors during the test.
Step 8. Performance Test Analysis and Report
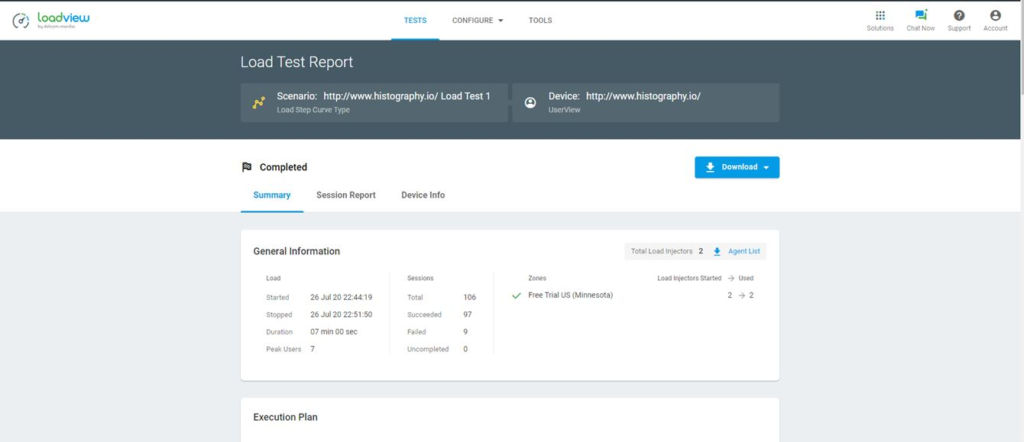
Once the test is complete, you will see the load test report with execution details and overall results. You will also receive the report by email, including a PDF attachment that can be shared with team members.
Final Thoughts: How to Run JavaScript Application Performance Tests
JavaScript frameworks make it possible to build rich, interactive applications, but that extra browser-side complexity needs to be tested. Load testing JavaScript applications helps teams understand whether real users can complete important workflows when traffic increases.
The EveryStep Web Recorder makes it easier to create realistic browser-based scripts without writing code from scratch. Learn more about using EveryStep Web Recorder.
The LoadView platform can help test websites and applications before major traffic events such as Black Friday, Cyber Monday, product launches, enrollment windows, or marketing campaigns. It is better to validate performance before a spike happens than to discover JavaScript, API, or browser-level bottlenecks during production traffic.
Get started today and sign up for the LoadView free trial, or sign up for a one-on-one demo with our performance engineers. They can walk through the platform and show how LoadView supports real browser testing for JavaScript-heavy applications.