Load testing is a crucial part of any software application or REST API development process. It helps you understand the functionality of a specific program to assure it works fine when it finally meets real users. These tests allow developers and companies to identify any bottlenecks. Plus, it saves time and secures the monetary resources to be extra utilized later (especially using load testing tools like Selenium). Likewise, API (Application Programming Interface) testing is a type of software testing that determines whether a newly developed application meets expectations, in terms of reliability, performance, operations, and security.
However, when focusing on REST API (a type of API), this allows two or more systems to communicate through HTTP, which is quite similar to web browsers and servers, to analyze the response time to each request made by a user. So, if you want to know more about REST API automation testing with the help of a short tutorial, dive in! But before jumping on the tutorial, it is extremely important to understand what API, REST, REST API, and automation testing is all about. So, let us cover them briefly one by one.
What is an API?
Wondering what an API is? Well, put simply, and API is a set of rules which help programs to communicate with each other. The developers create APIs on the servers, which permit clients to talk to them. Whether a typical consumer knows it or not, APIs are utilized in the services and applications they user every day. From viewing a weather forecast and logging in to your social accounts to paying for an item through PayPal, APIs are behind the scenes, working to provide you with a more personalized, connected, and secure experience.
Due to this fact, it is vital that APIs be thoroughly tested, as they play a significant role in development with other applications and integrations and a user’s experience. Their performance can make or break an opportunity.
What is REST?
REST stands for Representational State Transfer. It is a software architectural style that possesses rules (constraints), which are necessary to be followed by the developers. Nevertheless, one of the most vital constraints is that the web application should be able to deliver the data (information) whenever a command is given.
What is a REST API?
All the above information brings us nicely to the REST API. Let us get a better understanding of this term through some examples.
Imagine you are trying to find an airline that offers inexpensive tickets. You type your request in the search engine, and you get a whole list of companies. In the same way, when you are trying to search for videos on YouTube, you simply type the keyword or name in the search field and hit enter. The next thing you see is a long list of related videos.
More to this, when you open Google maps and look for a specific place you want to visit, you can also see the nearby amenities, such as restaurants and commute options. That happens because the companies have exposed their APIs, and REST API works almost in a similar way. You prefer to request some data using HTTP (or in simple words, the Internet), and you receive information or results from the companies you are requesting from.
Despite REST API playing a major role in almost every sphere, the e-commerce industry has been using this technology widely, as it is helping businesses by handling multiple users’ commands (requests) and returning distinct data formats. So, in short, from big business groups to normal individuals, it is serving the entire hypermedia that even includes someone who is just trying to upload an image, edit the profile information, or simply download a file.
Performing REST API Testing
There are two ways to test the REST API:
- Manual testing
- Automation testing
However, this tutorial is for automation testing. Also, there are important things to understand to interpret the results including methods and status code.
HTTP Methods for REST API Automation Testing
REST API uses five HTTP methods to request a command:
GET: To retrieve the information at a particular URL.
PUT: To update the previous resource or create new information at a particular URL.
PATCH: For partial updates.
POST: It is used to develop a new entity. Moreover, it is also used to send information to servers, such as uploading a file, customer information, etc.
DELETE: To delete all current representations at a specific URL.
HTTP Status Codes
Status codes are the response given by a server to a client’s request. They are classified into five categories:
- 1xx (100 – 199): The response is informational
- 2xx (200 – 299): Assures successful response
- 3xx (300 – 399): You are required to take further action to fulfill the request
- 4xx (400 – 499): There is a bad syntax and the request cannot be completed
- 5xx (500 – 599): The server entirely fails to complete the request
These codes help interpret the outcomes. So, if the REST API automation test results are between 2xx ranges that means the application’s functions are working ideally. For the majority of normal, everyday Internet users, status codes will never be something that they will even encounter or go looking for. For 1xx, 2xx, and 3xx status codes, these really are not considered errors, rather informative message and will not necessarily affect the user experience.
However, when we start getting into the 4xx and 5xx status codes, these are considered error messages and when something goes wrong, users will be faced with error messages as they are navigating through APIs. 4xx status code error messages typically occur when something happens at the client/browser level. 5xx status code error messages result in errors at the server level. While it is never good to see errors, these are especially important to remedy as quickly as possible, as they indicate serious problems and will greatly impact user satisfaction.
For more information about HTTP status codes, along with a comprehensive list of all the different codes and error messages, read our HTTP Status Codes List article on our Knowledge Base.
REST API Testing Tutorial with Postman API Testing Tool
The following tutorial is for REST API automation testing using Postman. Postman is a popular API client that allows developers and teams to test, share, create, collaborate, and document the API development process. The client is ideal to create and save the complex, as well as simple HTTP/s requests along with their responses. Postman can be downloaded as a Chrome extension, or you can visit the official website to download the program.
Test Scenario: Status Code Weekly
This is a sample REST API automation testing scenario to test all five methods on Status Code Weekly to find the status code of the website. Let us begin!
Testing GET Request
Note: After clicking this link (https://reqres.in/api/users?page=2) you would see the JSON code.
But the best thing about Postman is that if you have the API URL, you can simply paste it to get the status code, and the same rule applies to all other methods.
Test Tutorial: After launching Postman, select the GET method and copy the GET request link (https://reqres.in/api/users?page=2) and paste it in the ‘Enter request URL’ field. Once done, click ‘Send’ to see the ‘Status.’
Results: You can see that the status is ‘200 OK.’

Interpretation: ‘OK’ signifies that the GET request is functioning without errors as the status code is exactly 200.
Testing POST Request
Step 1: Click on ‘New Tab’ and select ‘POST’ from the drop-down menu.

Step 2: Copy and paste the POST request URL (https://reqres.in/api/users) in the ‘Enter Request URL’ field and hit the ‘Send’ button.
Results: The status code is ‘200 Created.’

Interpretation: ‘Created’ means that the POST request has succeeded, and a new resource has been generated.
Testing PUT Request
Step 1: Open ‘New Tab’ and choose ‘PUT’ from the options.

Step 2: Copy and paste the PUT request URL (https://reqres.in/api/users/2) in the ‘Enter Request URL’ field and click ‘Send.’
Results: Status is ‘200 OK.’

Interpretation: PUT request is functioning.
Testing PATCH Request
Step 1: Select ‘PATCH’ in the ‘New Tab.’

Step 2: Paste the PATCH request URL in the field and click ‘Send.’
Results: Status code is ‘200 OK.’

Interpretation: PATCH request is functioning properly.
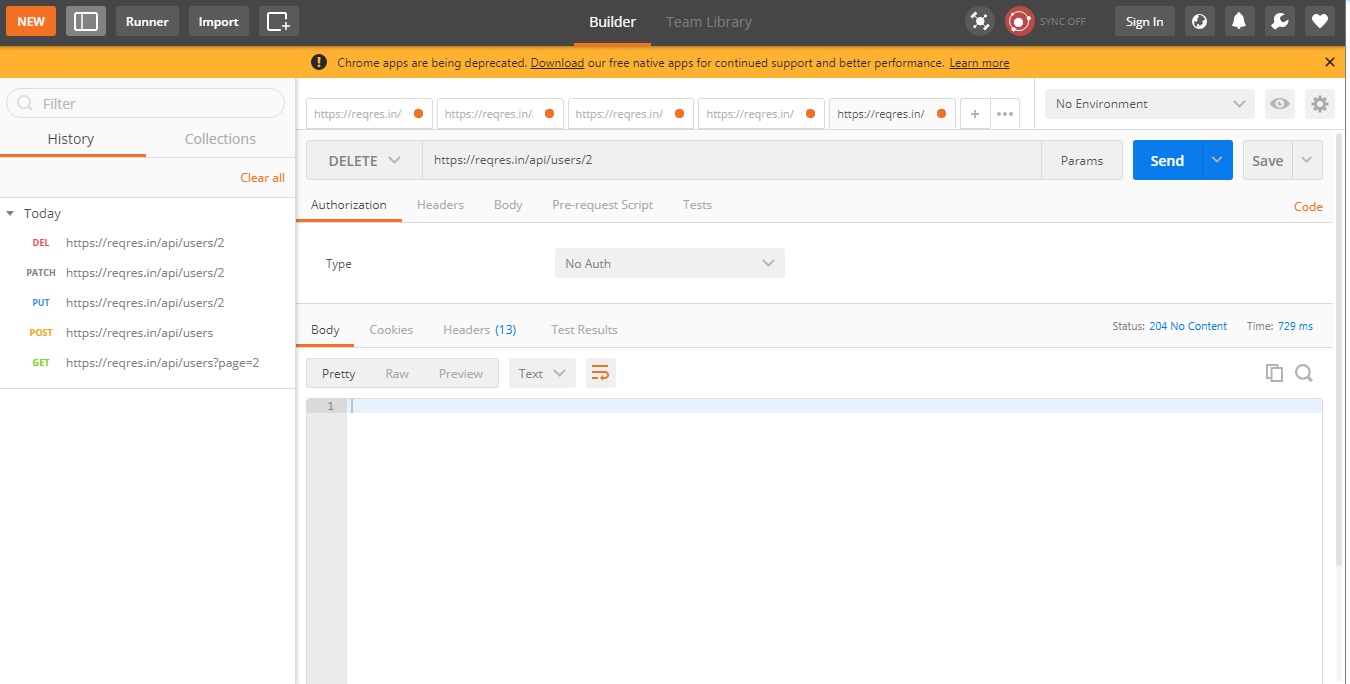
Testing DELETE Request
Step 1: Create a ‘New Tab’ and this time select ‘DELETE’ from the menu.

Step 2: Enter the DELETE request URL in the field and click the ‘Send’ button again.
Result: You can see that the Status is ‘204 No Content.’
REST API Testing Tutorial using REST Assured
REST Assured is a Java library for testing RESTful APIs. It is widely used to test JSON and XML based web applications. Furthermore, it fully supports all methods including the GET, PUT, POST, PATCH, and DELETE.
Still, you are required to have Java, Maven, TestNG, and IDE (IntelliJ, Eclipse, etc.) already installed in your system to run the test.
Step 1: Install Java
Step 2: Download an IDE (Eclipse)
Step 3: Install Maven and get it linked with Eclipse
Step 4: Create a Maven project first by adding dependencies to ‘pom.xml’. After that, create the test script, make sure to verify, and then run it.
Rest Assured Maven Dependency

TestNG Maven Dependency

Assuming you have installed all the tools, let us test the same GET Request, you have seen in the Postman, on Eclipse using REST Assured to find out the results. If you want, you can apply the same method to test other requests.
So, follow these steps for GET Request:
Step 1: Open ‘Eclipse.’
Step 2: Create a new ‘Java Package’ and name it.
Step 3: Create a new ‘Java Class’ and name it. For instance, ‘Get Data.’
Step 4: Now copy or write the same code mentioned below:
1 package getRequest;

2

3 import org.testing.Assert;

4

5 import io.restassured.RestAssured;

6 import io.restassured.response.Response;

7

8 public class GetData

9 {

10

11 @Test

12 public void testResponsecode()

13 {

14

15

16 Response resp=RestAssured.get("https://reqres.in/api/users?page=2");

17

18 int code=resp.getStatusCode();

19

20 System.out.printin(" Status code is "+code);

21

22 Assert.assertEquals(code, 200);

23

24 }

25

26

27 }

28
It should look like this:

Step 5: Now, right click near the code, hover on ‘Run As’, and click ‘TestNG.’
Run As > TestNG
Result and Interpretation: As you can see, the status code is 200 and it has ‘Passed’ the test.

Maximizing Rest API Performance: Load Testing Essentials
In the rapidly evolving landscape of software development, ensuring peak performance of APIs under various load conditions is not just a necessity but a cornerstone of a successful application. This section discusses the importance of load testing for REST APIs and how LoadView, an advanced load testing platform, can be a game-changer in optimizing API performance.
Understanding the Importance of Load Testing for REST APIs
Load testing is critical in understanding how your REST APIs perform under heavy traffic and high usage scenarios. It is not just about ensuring that the APIs work correctly but also about making sure they can handle the surge in user requests without compromising on speed or reliability. This kind of testing simulates real-world conditions, providing insights into how APIs behave under stress, helping to identify bottlenecks and performance degradation points.
Why Choose LoadView for Your API Load Testing?
LoadView stands out in the field of load testing for its ability to provide a realistic simulation of user behavior and traffic patterns. Unlike traditional load testing tools that merely bombard the server with requests, LoadView offers a more nuanced approach:
Real Browser Testing: LoadView utilizes real browsers, which means the testing is not just based on server requests but also includes client-side rendering and interactions, offering a more comprehensive load testing experience.
Flexible Test Scenarios: Whether it’s a sudden spike in traffic or a gradual increase, LoadView allows you to create various test scenarios to mimic different real-world situations.
Easy Integration with Existing Tools: For teams already using Postman for API development and testing, integrating with LoadView is seamless, enabling a more robust and comprehensive testing strategy.
Actionable Insights and Reports: LoadView doesn’t just highlight problems; it provides detailed reports and analytics that help you understand the performance under load, identify specific issues, and make informed decisions to optimize your APIs.
Implementing LoadView in Your Development Cycle
Integrating LoadView into your development process is not just about finding out if your API can handle the load. It’s about making load testing a part of your regular development cycle. Here’s how LoadView can transform your API testing strategy:
Continuous Testing: By incorporating LoadView into your CI/CD pipeline, you ensure that every version of your API is tested for load capacity before it hits production.
Resource Optimization: Understanding the load capacity of your APIs can help you optimize server resources, ensuring that you are well-equipped for traffic surges without over-investing in infrastructure.
Enhancing User Experience: Ultimately, the performance of your APIs directly impacts user experience. LoadView helps you ensure that your users enjoy a smooth, uninterrupted experience, even during peak traffic periods.
In the digital era, where API performance can make or break an application, LoadView provides a crucial toolset for developers and companies aiming to deliver high-performing, reliable, and scalable APIs. Whether you are a startup or a large enterprise, understanding and optimizing the load capacity of your APIs is key to delivering a seamless user experience. With LoadView, you’re not just testing; you’re preparing your APIs to meet the demands of the real world, ensuring they perform optimally when it matters the most.
Conclusion: REST API Automation Testing Tutorial
REST APIs allow two or more applications to communicate among themselves, as well as permitting users to command programs to get desired results. There are different ways to test REST APIs, but the most suggested process is through automation testing. And although there are some famous REST API testing tools, Postman and Rest Assured are currently in the spotlight. In this tutorial, we have tested some requests on both interfaces and shared the results. As expected, both platforms have shown similar outcomes. However, using REST Assured for REST API automation testing is more reliable as compared to Postman. But it demands professional developers.
And as great as these API development tools are, in order to properly load test your APIs, you need a solution that offers the functionality and features to scale performance tests. If you are using Postman for API functionality and looking to execute load tests against your APIs to determine behavior under load, the LoadView platform can help. Learn more about API testing with Postman. And if you are curious about knowing more, do not hesitate to get in touch with our team.
At LoadView, our team of load testing experts is available to help you get the most out of your load testing budget, and we offer an exceptional suite of tools that makes the process easy. Don’t leave load testing to an afterthought. With LoadView, you’ll be able to run a wide range of tests and easily integrate load testing into you development process, access valuable data, turn data into actionable insights, and improve your websites and applications for your users.
Save yourself time, money, and stress with our all-in-one load testing solution so you can devote more time to measurably improving your websites and applications for your users. Give your development team the ultimate load testing resource, and see the results in improved performance, more uptime, a better experience for your users, and even increased revenue. A fast-performing, consistent website sets your business apart from the competition. Start your LoadView trial and get up to 5 free load tests.