Every application component needs resources to run properly. The amount of memory, CPU, disk I/O, or network bandwidth required can change throughout the application lifecycle as traffic, user behavior, and background workloads change. Predicting the exact amount of capacity you need at all times is difficult because there are many moving parts.
Most applications also have performance targets they need to meet. As workload increases, the application should maintain acceptable response times, error rates, and availability. This is where Azure Autoscale helps. Autoscale allows Azure resources to scale out or scale in based on defined conditions, helping applications respond to changing demand without constant manual intervention.
Autoscaling
In Figure 1 below, the application load is still within the available resource limit. When autoscale is not in place, connected users and new users may begin to experience performance issues as traffic approaches the resource threshold, as shown in Figure 1.2. Once the workload exceeds the available capacity, the application may slow down, queue requests, or fail to respond consistently.
Figure 2 shows the benefit of autoscaling. As traffic and application load increase, available resources increase as well. Instead of relying on a fixed amount of capacity, the application can add resources when demand rises and reduce resources when demand falls.
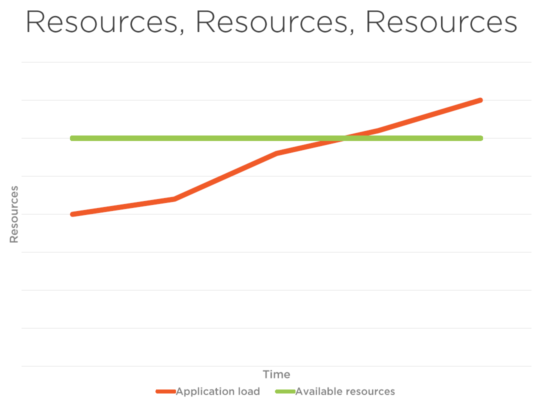
Figure 1
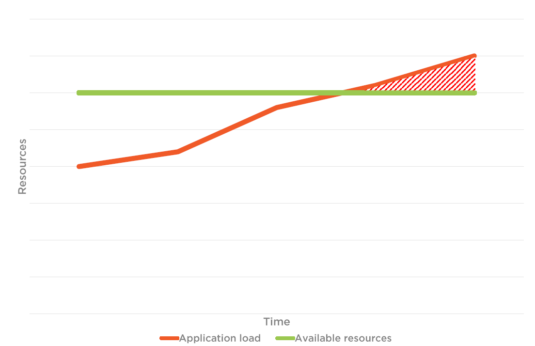
Figure 1.2
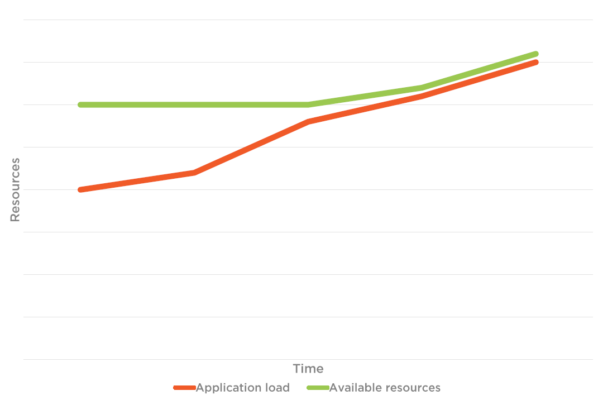
Figure 2
Compute Solutions in Azure
- App Service. Azure App Service is a managed hosting service for building web apps, mobile back ends, and RESTful APIs. It is commonly used for web applications that need managed infrastructure, deployment options, and scaling support.
- Azure Cloud Services. Azure Cloud Services is a platform-as-a-service option designed to support scalable and reliable applications. It gives teams more control over the underlying environment than App Service while still using Azure-managed infrastructure patterns.
- Azure Service Fabric. Azure Service Fabric is a distributed systems platform for packaging, deploying, and managing scalable microservices and container-based applications. It is often used for complex, enterprise-scale workloads.
- Azure Functions. Azure Functions allows developers to run event-driven code that responds to HTTP requests, queues, timers, storage events, and other triggers. Functions are commonly used for serverless APIs, background processing, and integration workloads.
- Virtual Machines. Azure Virtual Machines allow teams to create and manage cloud-based infrastructure as a service. You can use Azure-provided images, partner images, or your own custom images to build the virtual machine environment.
Types of Autoscaling
Vertical Autoscaling
Vertical scaling means changing the size of a virtual machine or resource. You scale up when you need a larger instance with more CPU, memory, or other resources. You scale down when the application no longer needs that level of capacity.
The application hosted on the VM may remain the same, but the underlying resource size changes. This type of scaling is not always efficient in a cloud environment because it may require downtime or manual planning. In many cases, a virtual machine must be stopped, resized, and restarted before the new capacity is available. That affects the application because it may need to go offline while the change is applied.
Another option is to provision a new virtual machine with the desired size and move the application once the new VM is ready. This can reduce some downtime, but it still requires migration planning and may not be ideal for workloads that need continuous availability.
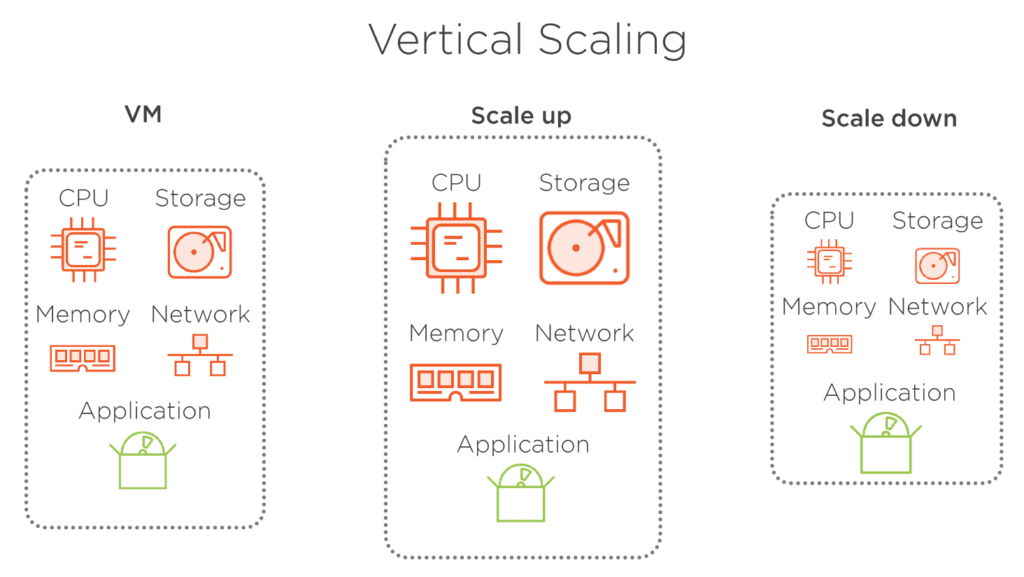
Figure 3

Figure 3.1 – Application availability may be affected when vertical scaling requires a restart.
Horizontal Autoscaling
Horizontal scaling means changing the number of running instances while keeping the instance size the same. You scale out by adding more instances and scale in by reducing the number of instances when demand drops. This approach helps maintain performance by distributing load across multiple instances of the same application.
Horizontal scaling is usually more flexible for web applications because it can add capacity without resizing a single VM. It also supports higher availability because at least one instance can remain running while others are added or removed. Horizontal scaling typically requires load balancing so traffic can be distributed across running instances. In many Azure services, this load balancing is handled as part of the platform or the scale set configuration.
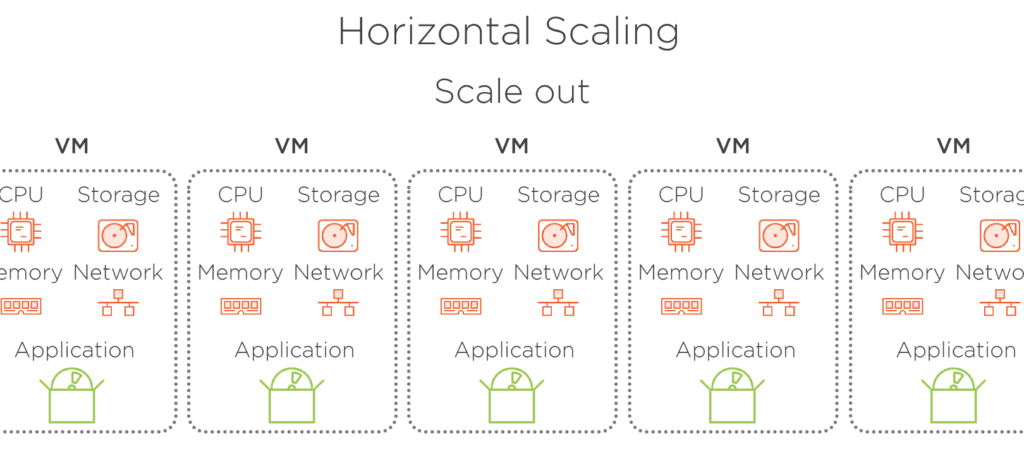
Figure 5. Scaled out when traffic increases.
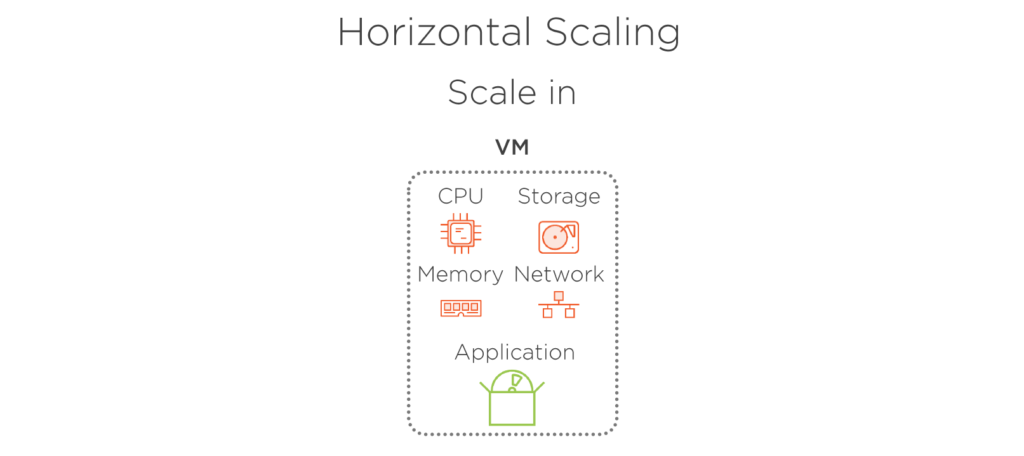
Figure 5.1 – Scaled in when traffic decreases.
Monitoring and Alerts
There are several ways to monitor whether Azure adds or removes resources for a service. Administrators can review scaling behavior in the Azure portal, such as through the scaling blade for Virtual Machine Scale Sets. This view is useful for technical teams, but it may not be practical for every owner, contributor, or stakeholder because it requires portal access and manual review.
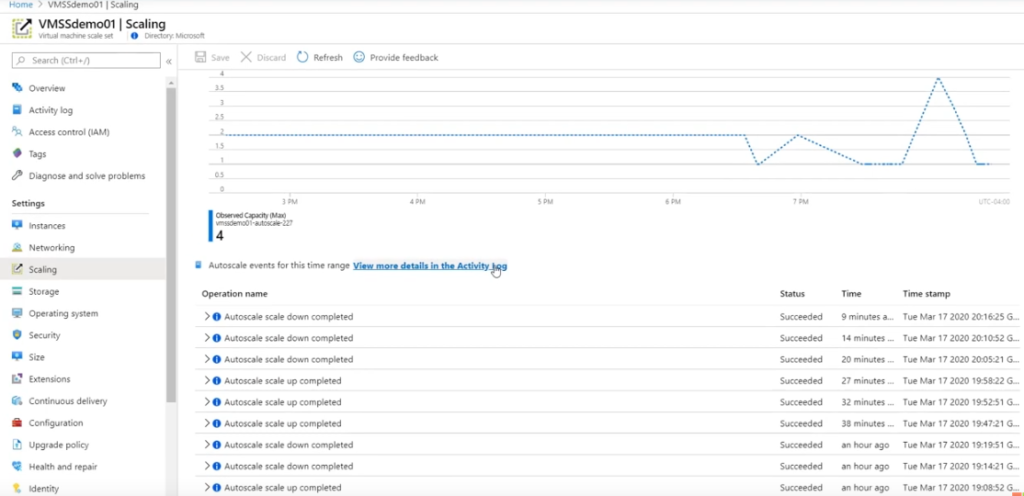
Figure 6
Alerts
You can configure notifications when scale-out or scale-in events occur. Alerts help teams understand when Azure Autoscale is reacting to demand, whether the scale event happened at the expected time, and whether the application stabilized afterward.
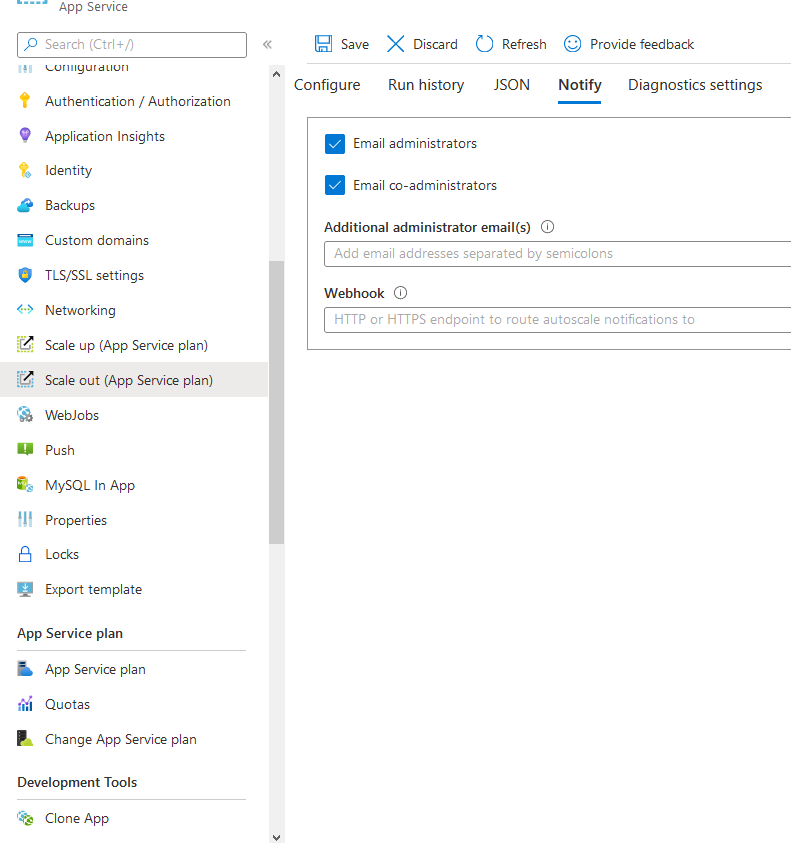
Figure 7
Application Insights and Azure Monitor can provide visibility into server response time, request volume, failures, dependencies, and other performance signals. These metrics are important because autoscaling alone does not guarantee good user experience. You need to know whether response times, error rates, and dependency calls remain healthy while resources are being added.
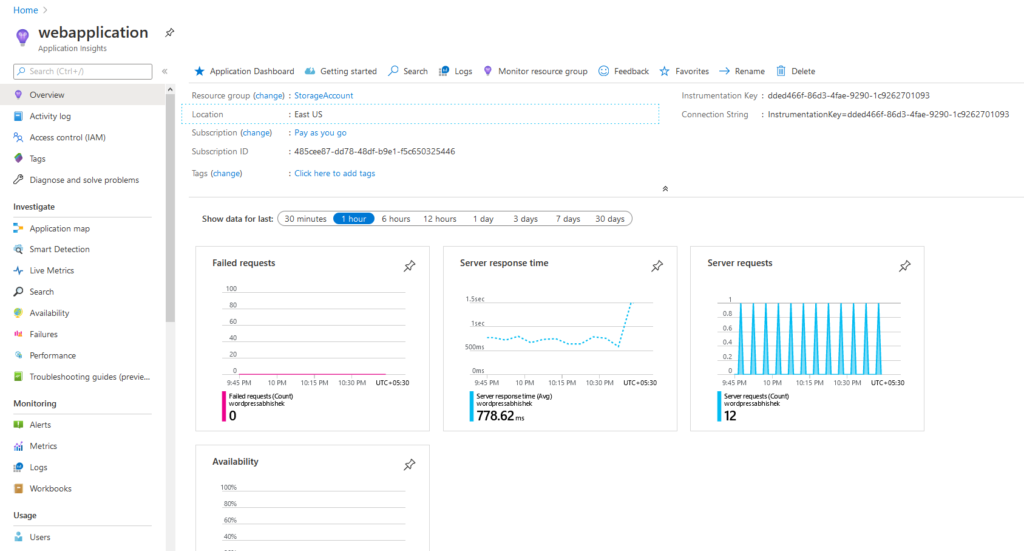
Figure 8. Application Insights showing average server response time and request volume for an app service.
To configure autoscaling for an App Service Plan, go to Scale out, choose the scaling configuration, add a scale condition, select an appropriate metric such as CPU percentage, memory, request count, or another available signal, and save the rule.
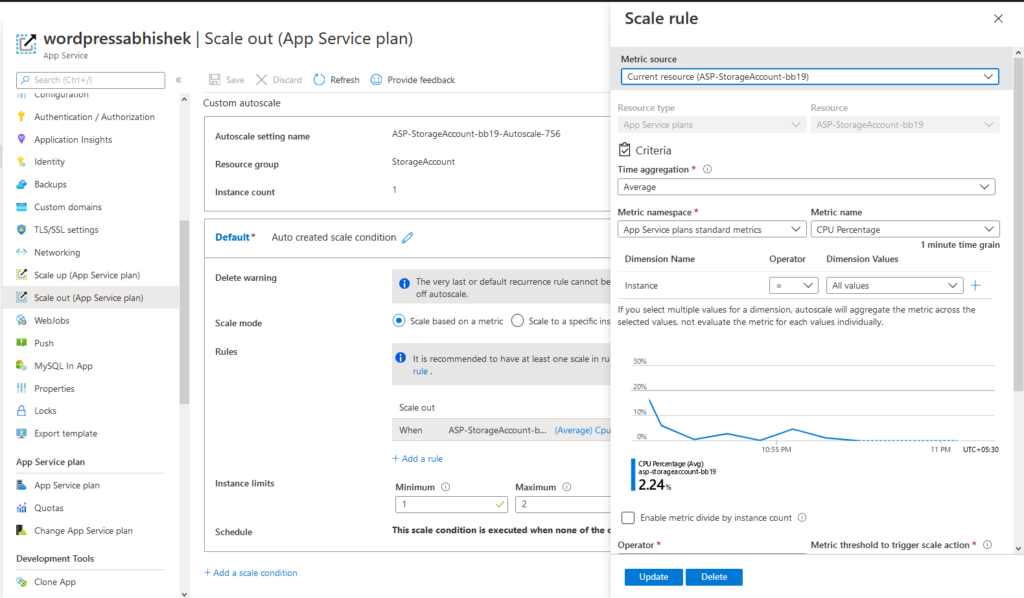
Figure 9. Configuring autoscale conditions in an App Service Plan
When you use Azure Autoscale, Azure can handle much of the scaling infrastructure for supported services. However, teams still need to define appropriate scaling conditions, test how quickly scaling occurs, and verify that the application remains responsive during the scaling window.
Note: Standalone VMs may require additional configuration. Virtual Machine Scale Sets are designed to support autoscaling and load balancing patterns, but the exact configuration depends on how the environment is set up.
Azure App Service can reduce administrative overhead by handling much of the scaling process through platform-managed settings. However, autoscaling should still be validated. Poorly chosen thresholds, long warm-up times, slow dependencies, or backend bottlenecks can still create performance issues even when new instances are eventually added.
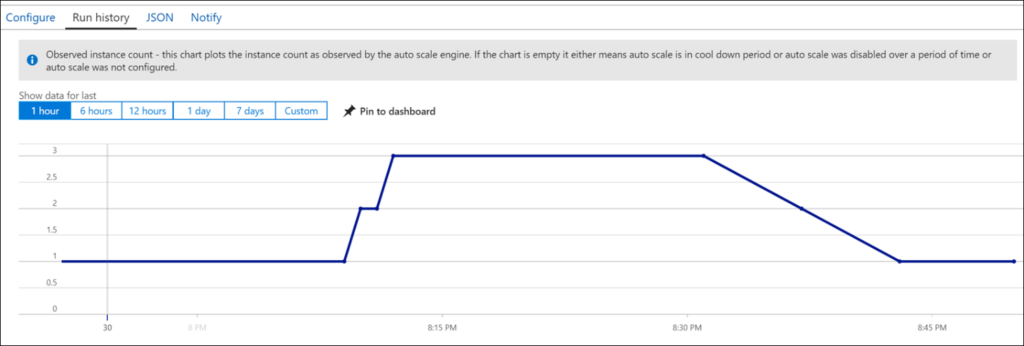
In Figure 10, a VMSS, or Virtual Machine Scale Set, scales automatically when the configured conditions are met.
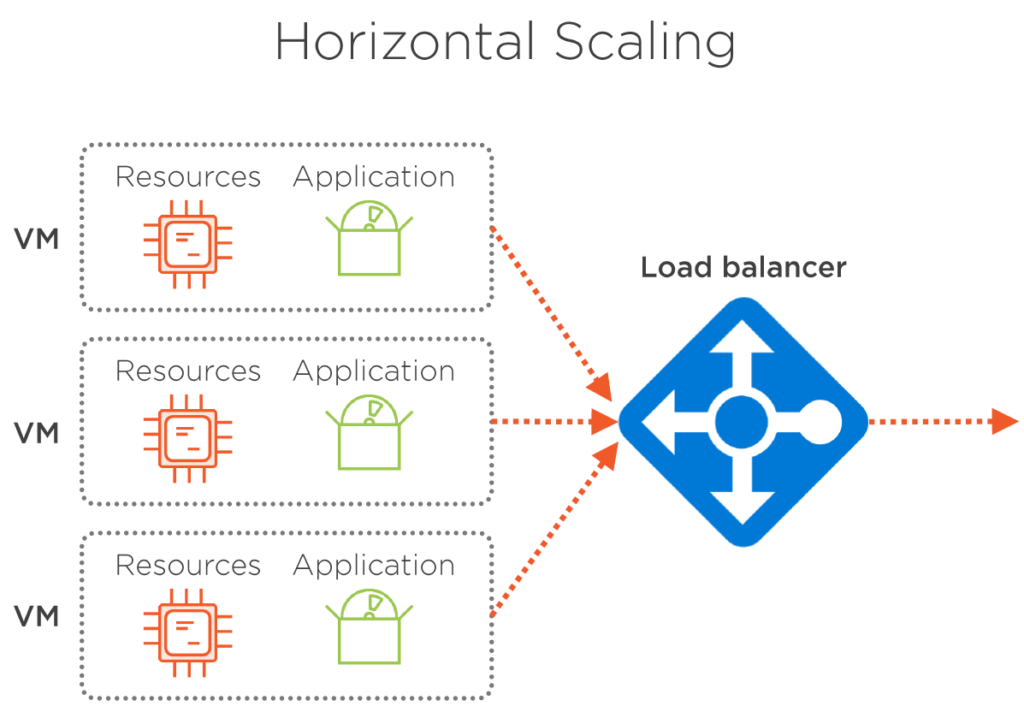
Figure 10. Virtual Machine Scale Sets with Load Balancer.
Testing Azure Autoscale
Testing is an important part of validating any web application. Without testing, you cannot know whether the application can handle real traffic or whether autoscaling reacts quickly enough to protect users. Load testing and stress testing help teams understand response times, error rates, resource usage, and scaling behavior under controlled traffic.
Azure-native tools, Azure Monitor, Application Insights, and external load testing platforms can all help validate performance. The key is to design tests that reflect real user behavior and trigger the scaling conditions you expect to rely on in production.

Figure 11. DevOps dashboard for testing
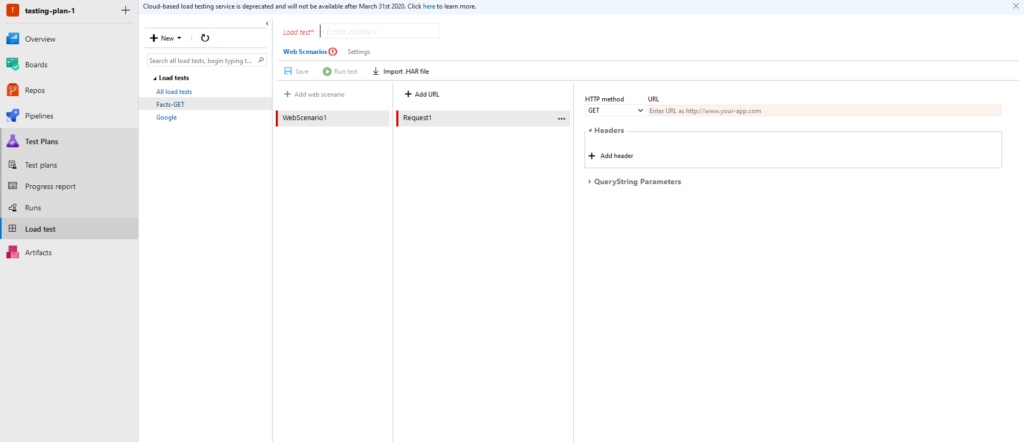
Figure 12. Example test setup and service metrics used during performance testing.
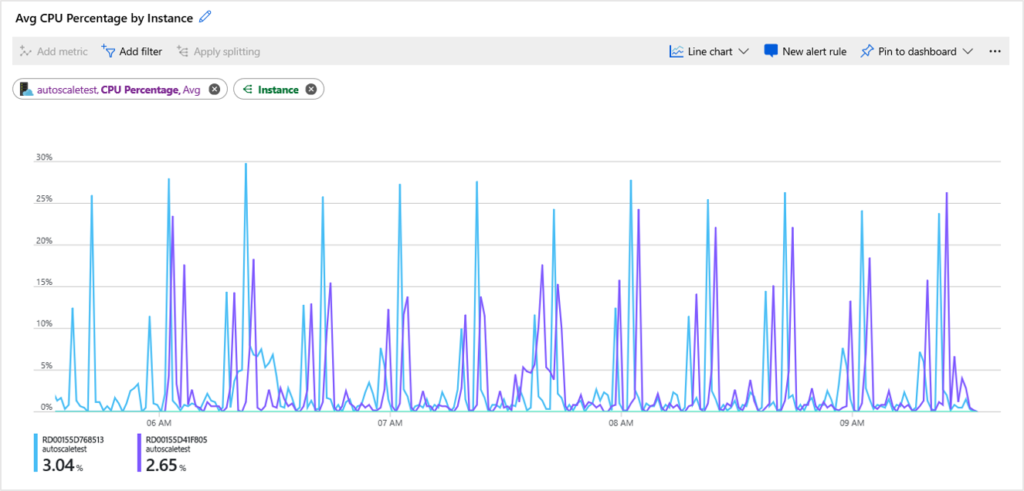
Figure 13. CPU graph for the tested application.
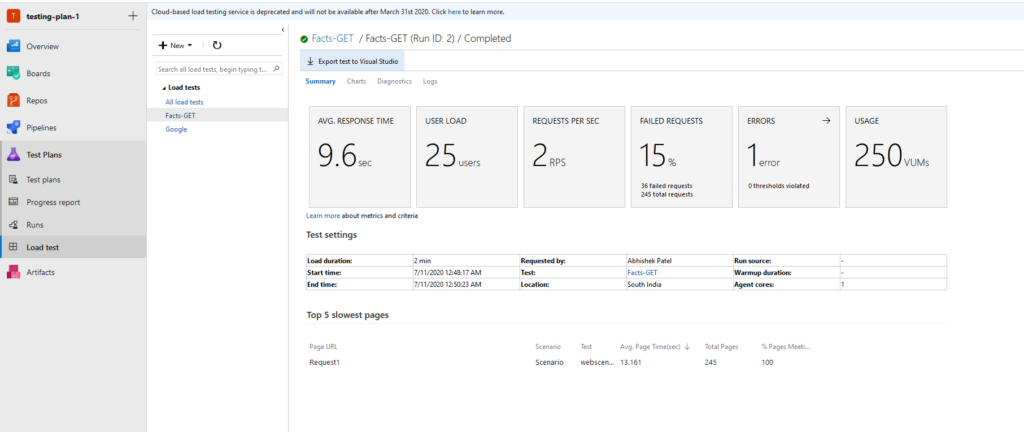
Figure 14. Sample results for a GET API with response time, user load, requests per second, and related metrics.
Using LoadView to Verify That Azure Autoscale Works Properly
Autoscaling is usually triggered when configured metrics such as CPU, memory, request count, queue depth, or other signals cross a defined threshold. However, the fact that scaling occurs does not automatically mean users are protected. There is often a delay between the traffic increase, the metric crossing the threshold, the scale-out event, the new instance becoming ready, and the load balancer sending traffic to it.
In Figure 15, the graph is included in a report provided by LoadView when you run a test against a URL or endpoint. The first graph shows a constant number of users visiting the site based on the load test strategy. After a certain point, average response time increases substantially because the application does not have enough capacity to handle the load.
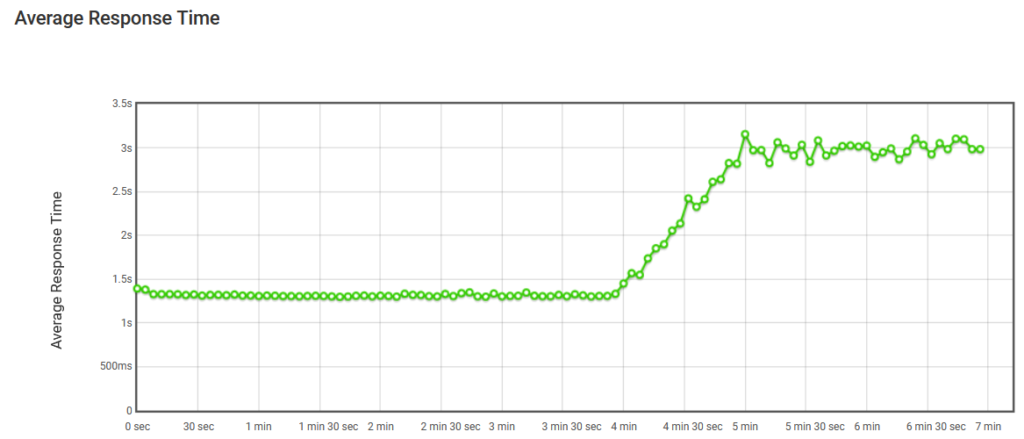
Figure 15. Average Response Time Without Autoscale
With autoscaling in place, the application can add resources when user load increases. In Figure 16, the instance hosting the web application scales out based on the configured conditions. Once the additional capacity is ready, average response times stabilize. When users are no longer connected and load decreases, the extra instances can be removed so the environment returns closer to its original capacity.
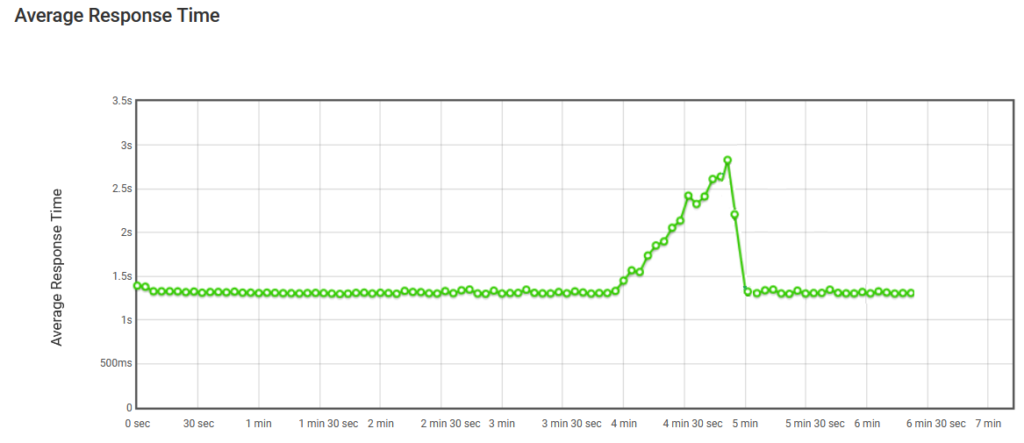
Figure 16. Average Response Times with Autoscale
In Figure 17, the LoadView report shows cumulative sessions increasing during the test. This helps teams confirm whether the application scales as expected while user sessions increase. The results should be reviewed alongside Azure metrics such as instance count, CPU, memory, dependency latency, request failures, and scale event history.
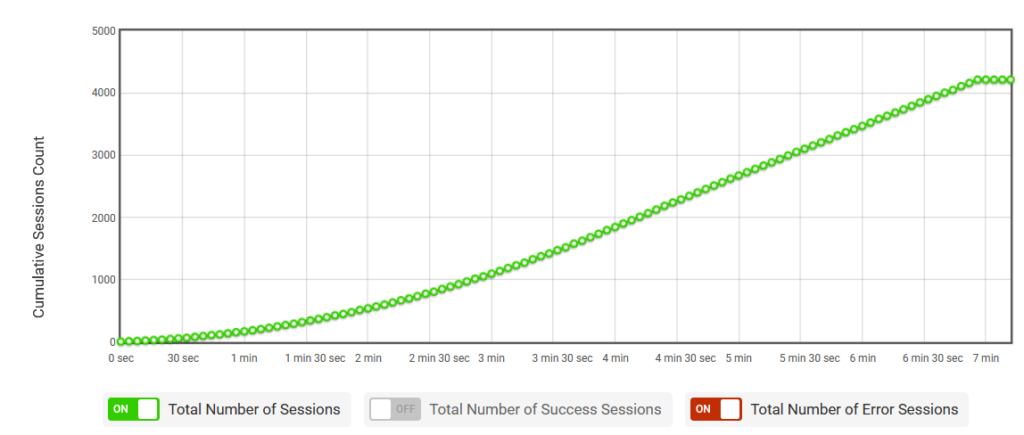
Figure 17. The number of cumulative sessions
Testing Azure Autoscale: Conclusion
Microsoft Azure Autoscale can help applications respond to changing demand without requiring teams to manually add and remove resources. Azure can handle much of the scaling infrastructure for supported services, but the scaling rules still need to be tested. Autoscale can trigger too late, scale too aggressively, miss the real bottleneck, or add capacity while users are already experiencing slow response times.
Using a solution like LoadView helps verify whether Autoscale is working as expected from the user’s perspective. By running realistic load tests and reviewing the results alongside Azure Monitor and Application Insights, teams can confirm whether scaling protects performance, where delays occur, and what thresholds need to be adjusted before production traffic arrives.
Try LoadView for yourself and receive up to 5 free load tests to start.