Developing a website for your business is a smart way to interact with modern-day customers. Although traditional practices are still quite visible, having an online presence of your organization is certainly the need of the present and future. In the past, website designing and development were as hard as metal. However, since the birth of WordPress, website development has become much easier. Where experts used to invest months in the development process, now experienced coders can ready a website within a few days through WordPress. But the problem begins when the site delivers unsatisfying results. That’s why it’s always suggested to run load testing on your WordPress website to know the issues before losing your important potential customers and existing clients.
What is WordPress?
Most people know it as a tool for creating a website, but let’s overview WordPress (WP) more technically. WordPress is an open-source website development platform that uses PHP coding and MySQL database. It is one of the simple and most powerful website content management systems (CMS) that has been ruling the industry since 2003. Also, it’s a prominent platform to create blogs, portfolios, forums, e-commerce, and several other kinds of websites.
According to statistics, there are 75 million websites that have been created using WordPress. That assures gaining 58 percent of the market share in the entire world. Some of the prime examples include BBC America, The Walt Disney Company, and The New York Times.
What is Load Testing?
Ask yourself, would you visit a website that takes forever to open? And would you trust the source if it leaks your personal information, such as transaction details, username, and passwords? Of course, you won’t. That’s why all programs, including websites, go through several tests to identify problems. These flaws are necessary to mitigate, as they directly affect the user experience. However, as being a part of performance testing, load testing is run to monitor your website’s ability to handle load and shifting behaviors in real-time.
Testing the Critical Elements of a Website
Well, this could be the longest section, as even several hundred pages of books couldn’t define each element. However, the testing checklist depends on the nature and size of the website. But most WordPress developers test at least six critical elements for the website’s quality assurance. We’ll talk about these elements more in detail below.
Broken Links
Broken links are huge disappointments to your visitors. These links may seem ineffective, but they could severely damage your entire website’s credibility. Broken links also harm your web’s bottom link when they are linked to sales pages, opt-in page, login, or other important sections of your website that helps to convert potential customers into buyers.
Website Speed
Did you know that if your website’s load time is above one second, then you must prepare yourself to lose some important conversions? Why? Because it breaks users’ flow. Moreover, it diminishes your Google ranking and other search engines’ ranking. Therefore, it is important to test the website speed to keep it competitive.
Ping Test
Ping is a process to measure the minimum time required to send and receive a small data amount. It’s a parameter to test if the specific host is easily reachable or the system is facing obstacles. A ping test can run to check the network, servers, and even websites.
Conversion Rate
Another essential element is the conversion rate. For instance, you have a WordPress-based online store that sells accessories. So, if the mobile conversion rate is less than your desktop conversion rate, then the developers would test your website to enhance the mobile shopping experience.
Uptime
When a website is not functioning as expected or isn’t available online for the end-users to complete a particular task, then the platform is appraised as experiencing downtime. There could be a plethora of reasons for downtime including poor web hosting, hardware failure, CMS issues, DNS problems, and malicious attacks. So, to identify the cause or causes, your website requires proper testing. WordPress uptime is also largely depending upon having good web hosting. If you take the time to do your research and choose the best WordPress hosting provider, you can avoid a lot of hassle and downtime.
Inaccurate Information
And last but not the least, whether you have a small business or running a multinational corporation, if your website has incorrect details about the products and services your company is offering, chances are that you lose customers. That’s why it is essential to keep checking the content on the daily basis.
Tools to Identify the Factors Responsible for Delaying Your Website’s Speed
A speedy website is always attractive to the visitor. Whether you have a personal blog or business website, it’s important to evaluate the factors responsible for slowing down the speed. While most free tools are unable to showcase accurate results, Dotcom Tools’s free website speed testing tool enables you to examine the website speed from 25 distinct locations, including China, London, Paris, Washington DC, Mumbai, and Tel-Aviv.
After the test’s completion, you can select Details to obtain waterfall chart analysis and performance reports. Plus, the free speed testing tool allows you to pick different browsers to run the test. And the best part is that the tool supports all leading browsers, such as Internet Explorer, Firefox, and Chrome, as well as iOS, Android, and Windows for mobile browsers.
Speed Test/Performance Report – What to Expect
When you opt for the Dotcom-Tools speed test tool, you get all the vital details, such as:
- 10 percent of elements with optimum performance
- 10 percent of elements with the lowest performance
- Details as per your selected location
- Identification of errors and diagnostics
- Waterfall chart
- Summary related to downloading speed, first packet, DNS, and many more
Importance of Load Testing to Understand User Experience
Load testing defines the maximum load-bearing intensity of any application. In the specific website scenario, it helps determine whether or not the present infrastructure is adequate to run the website. Moreover, it informs about your WordPress site’s sustainability during peak loads. Therefore, through load testing, you can understand the expected problems your users may face each time they pay their visit to your online portal.
So, with load testing, you can learn the following things:
- Can multiple users utilize available website features (shopping carts, special offers, etc.) at a single time?
- Is the transaction response time suitable enough to provide user satisfaction?
- Are users happy with the website design and development under extensive load?
- Can users easily view the website on handy devices, such as iPad, iPhone, and tablets?
- Are users enjoying visiting the website from all mainstream browsers?
Steps You Should Take Before Load Testing Your WordPress Site
Before starting, make sure you know all the prerequisites of load testing.
Know Your Objective
The first thing you should do before load testing your site is to know the objectives for starting the test. Also, you should consider the main parameters, such as the following:
- Throughput
- Response times
- Maximum visitor load
- System capacity
Put Yourself in Your User’s Shoes
Before beginning the load test, gather your team and brainstorm to find the most critical functions of your website for the users. Think about how these functions can induce trouble for users when there’s enormous traffic. You have to step in your visitors’ shoes to understand the real flaws they could face when the site is full of transactions and activities.
Apply the Shift-Left Approach
It is always wise to use the shift-left testing method. It’s the best way to save time and resources. Failure to adopt this procedure can result in the waste of hard work, monetary resources, and loss of customers.
Find Realistic Data
Successful load testing requires multiple attempts. For instance, in the first phase, you would test the website in normal condition and note the response time. In the second phase, you would increase the traffic and analyze the behavior and response time of the website. Similarly, you might need to continue the same process until all your objectives are met.
You should keep in mind that finding realistic data in each phase is necessary, as it will work as a benchmark, and help you identify and solve the problem.
Deciding On the Right Tool
You should be well-aware of the tools you would utilizing for load testing. For instance, LoadView offers many load testing features, like multiple test curves tools to get accurate results.
Simulating Realistic Load to Match Real Users
Your WordPress-based website is expected to have multiple users, using different features at the same time. That’s why you have to develop realistic user scenarios (testing scripts) and run the test to analyze your site most realistically. However, to begin learning the behavior, you have to understand the importance of scripting critical rendering paths, product pages, logins, shopping carts, order management system, auto email system, and all essential elements.
Remember, all these key elements are required to be tested simultaneously to identify what features are likely to crash first at a certain load, or simply to monitor their performance under normal and excessive stress (traffic).
So, let’s discuss both tools by taking Disney’s website as an example.
Load/Stress Testing with LoadView
In this section, you are about to learn how you can use the LoadView load/stress testing solution to test your WordPress-based website speed.
After signing up for a free trial, log in to your account. New free trial users receive up to 5 free load tests.
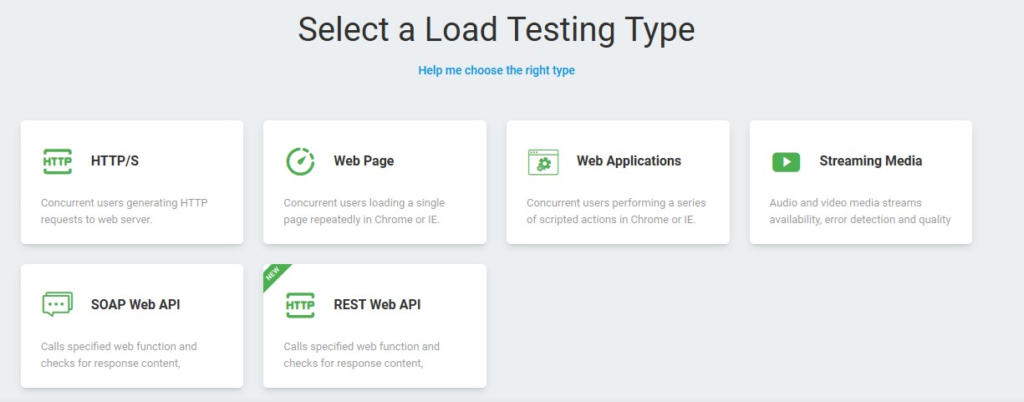
Now, select the load testing type. In this case, you will click the Web Page option to run a web page speed test on Disney’s official website. .
Next, you will need to name a ‘Device’, enter the website address, and select the browser type.
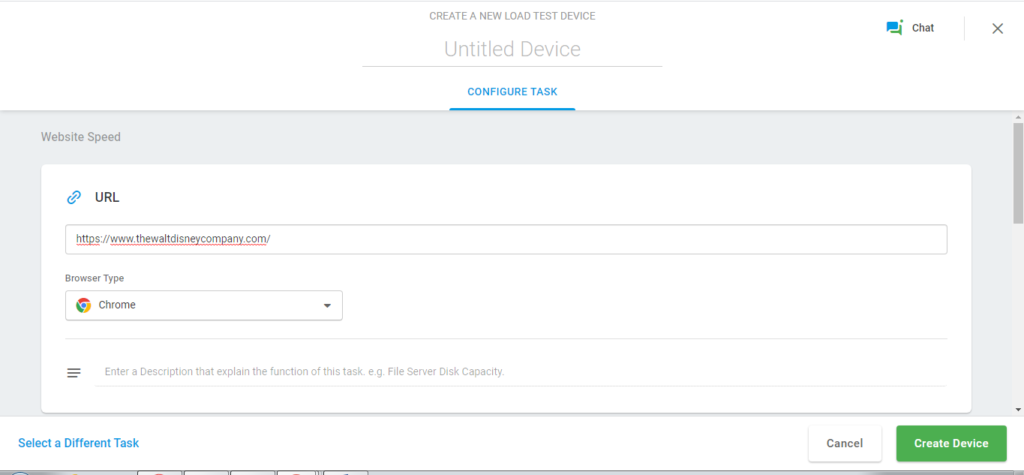
Assure giving your test a new nickname so you can identify it later when running multiple tests. Also, make sure that the Validation Result is checked. Once done, you have to click the Create Device option.

Now, as we are running the Load Step Curve option, you can adjust the execution plan as per your requirements. For instance, in this case, we have started with one user, and after every two minutes, the users will increase by three, and as soon as there will be seven users, the website will hold the amount for five minutes. That means the total test duration is of seven minutes with seven peak virtual users.

In the screenshot below, you can see the Load Injector Payload section. You can use this option to distribute the equal load on each injector. It is recommended to leave the settings as it is. However, you can change the number as per your need. The Geo Distribution helps you set the traffic destination. The zone is fixed to the US (Minnesota) for the free trial, but you can choose from nearly 20 other zones if you have a premium account.
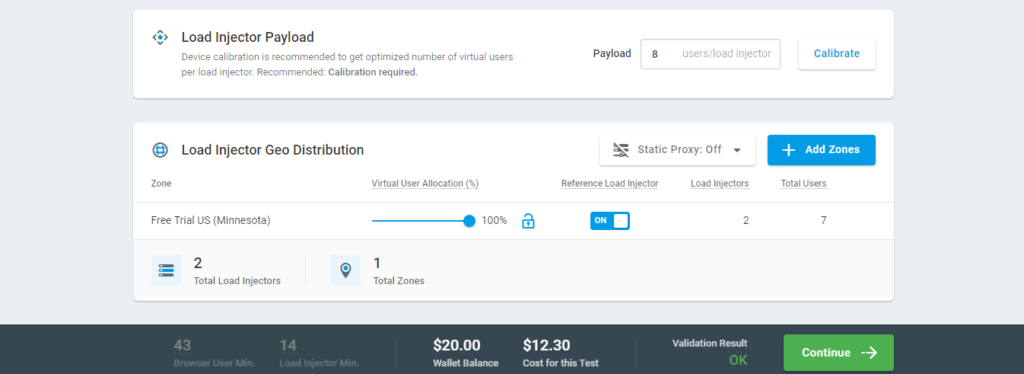
And because we’re using the LoadView free trial, you can see testing credits in the wallet, and right next to it is the test cost, $12.30, so you can see exactly how much the it will cost before executing the load test. As soon as you will click the Continue button, the test will begin. Once it is completed, a report is generated to see the results.
Using The EveryStep Web Recorder for Web Application Load Testing
The EveryStep Web Recorder is a web-based scripting tool that records your browsers’ interaction with websites and applications. It helps you to identify real-world behavior within mobile and desktop browsers. Furthermore, it provides detailed analysis related to performance that helps developers to identify bottlenecks and other errors on applications before it is live. And most importantly, it can check speed and provides reports and dashboards to see exactly which elements could be slowing your applications down. So, let’s find out how The EveryStep Web Recorder can be used for creating load testing scripts.
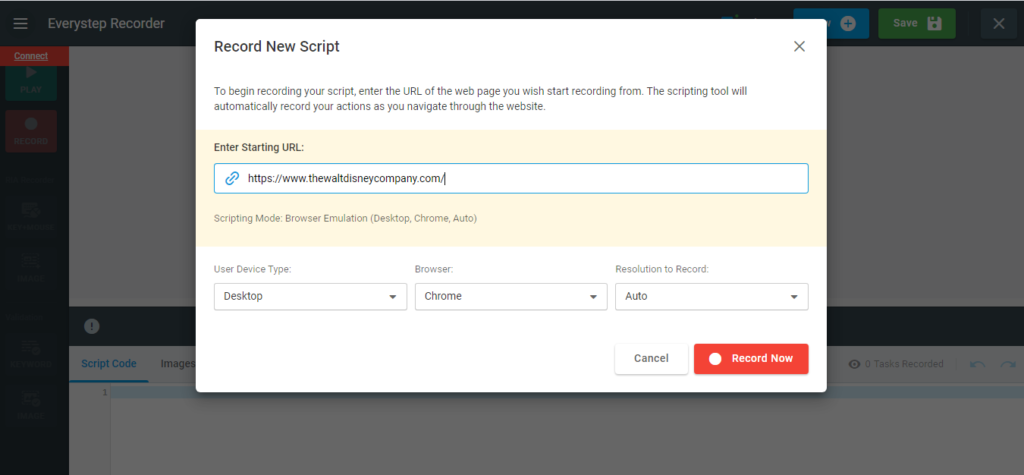
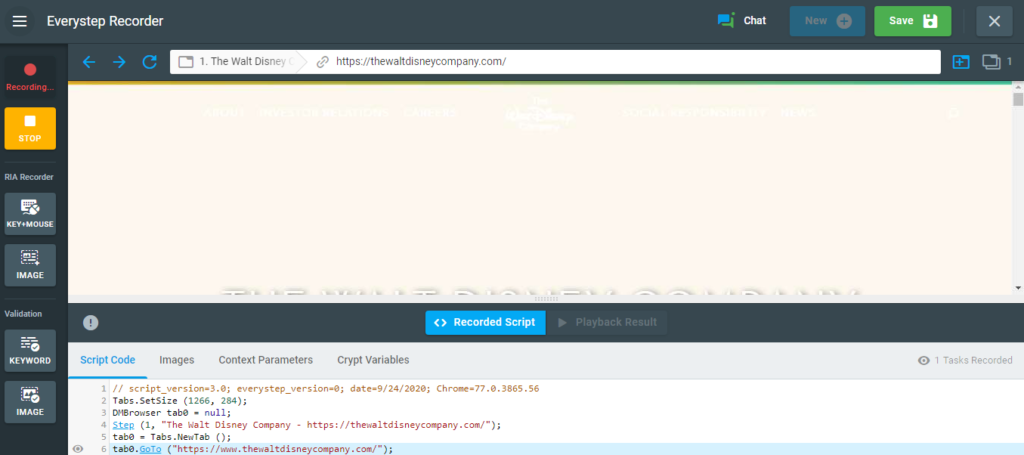
To begin, log in to your account. In this case, we will need to pick Web Applications as our aim to create a specific set of scripts through Disney’s website.
To start recording the script, you have to enter the URL, user device type, browser, and recording resolution in the Record New Script section. For testing Disney, we have selected the Chrome desktop browser. You can set recording resolution to Auto, and click Record Now.
You will eventually see that recording will begin and there will be script codes appearing below as you navigate through the site. You can stop the recording and play it to make sure it’s saved.
Once the recorded script is saved, you will be directed to another page where you have to name the new device. You also have the option to manually edit the script here, as well as set timeout options, etc.
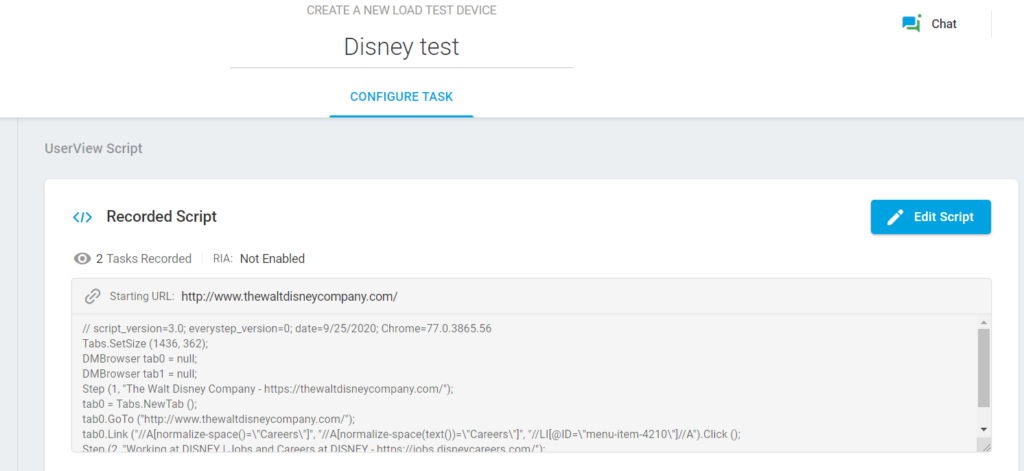
Once your script is saved, you are brought to the Test Scenario screen where you can begin to set up your load test, regions, load curves, etc. Similar to the steps we described above in our Web Page test example.
Things to Look for During the Load Test
When your website or application is in the middle of the load test, make sure you follow these practices:
- Keep enhancing the load
- Setting proper and logical scripting
- Carefully noting the benchmarks to ease load test repetition and acquire correct results
- Measuring the response time in each phase
- Consider running long-duration tests with continuous monitoring
Things to Look for After the Load Test
Finally, after running a load test on the website, you need to evaluate the obtained results. And the best way to do it is by analyzing the metrics.
- Average response time
- Peak response time
- Number of errors
- Requests per seconds
- Throughput
- Concurrent users
Conclusion: How to Load Test a WordPress Website
Your WordPress website needs to go through load testing to assure its performance under different amounts of traffic. It’s one of the best ways to identify errors in your website that are the main cause of slowing down its speed and efficiency.
And if you’re still puzzled about any part of the process, you can contact our engineers and discuss all your concerns. Our team is always available to help any questions and resolve any issues. Start your LoadView trial today!